This article provides end-to-end instructions for deploying imper.ai for Zoom.
It covers both:
The technical integration of Zoom as a communication channel, and
The steps required to activate meeting protection for Zoom meetings created by protected users.
Zoom integrations involve multiple components, including Server-to-Server OAuth, event subscriptions, and optional client-side deployment.
Follow the steps in the order listed to ensure successful deployment and protection.
Prerequisites
Before connecting imper.ai to Zoom, administrators must ensure that all prerequisites are met and that deployment steps are completed in the correct order.
Before you begin, ensure that:
A supported Identity Provider (IdP) is already connected in imper.ai:
Microsoft Entra ID or
Google Workspace
You have Zoom account administrator privileges
Your Zoom account supports Server-to-Server OAuth apps
You have Admin access to the imper.ai Admin Console
Outbound connectivity to Zoom APIs is allowed from your environment
You have reviewed internal security and compliance requirements for third-party integrations
Some Zoom configuration steps must be performed by an account-level admin.
Role-based admins may not have sufficient permissions.
Integration Components
The Zoom deployment consists of several dependent components that work together to enable meeting protection:
Zoom Communication Channel
Uses Zoom APIs, webhooks, and event subscriptions to monitor meetings and participants.
Zoom Permissions
Required to retrieve meeting metadata, participant context, and security signals. The full list of permissions requested by imper.ai, including scope descriptions and security considerations, is documented separately.
imper.ai Zoom Add-on (optional)
A Zoom client add-on that provides protected users with in-meeting visibility and verification indicators.
The add-on does not replace backend monitoring.
Each component is configured separately and activated in sequence.
What Not to Do
To avoid configuration issues:
Do not deploy the Zoom Add-on before connecting the Zoom communication channel
Do not skip the permissions review
Do not assume the Zoom Add-on replaces backend integration
Do not mix end-user steps into the administrator onboarding process
Deployment Procedure
Step 1: Begin Zoom Connection
Log in to imper.ai using your administrator credentials or Single Sign-On (SSO).
Navigate to Integrations.
In the Zoom Interaction Channel, click Connect.
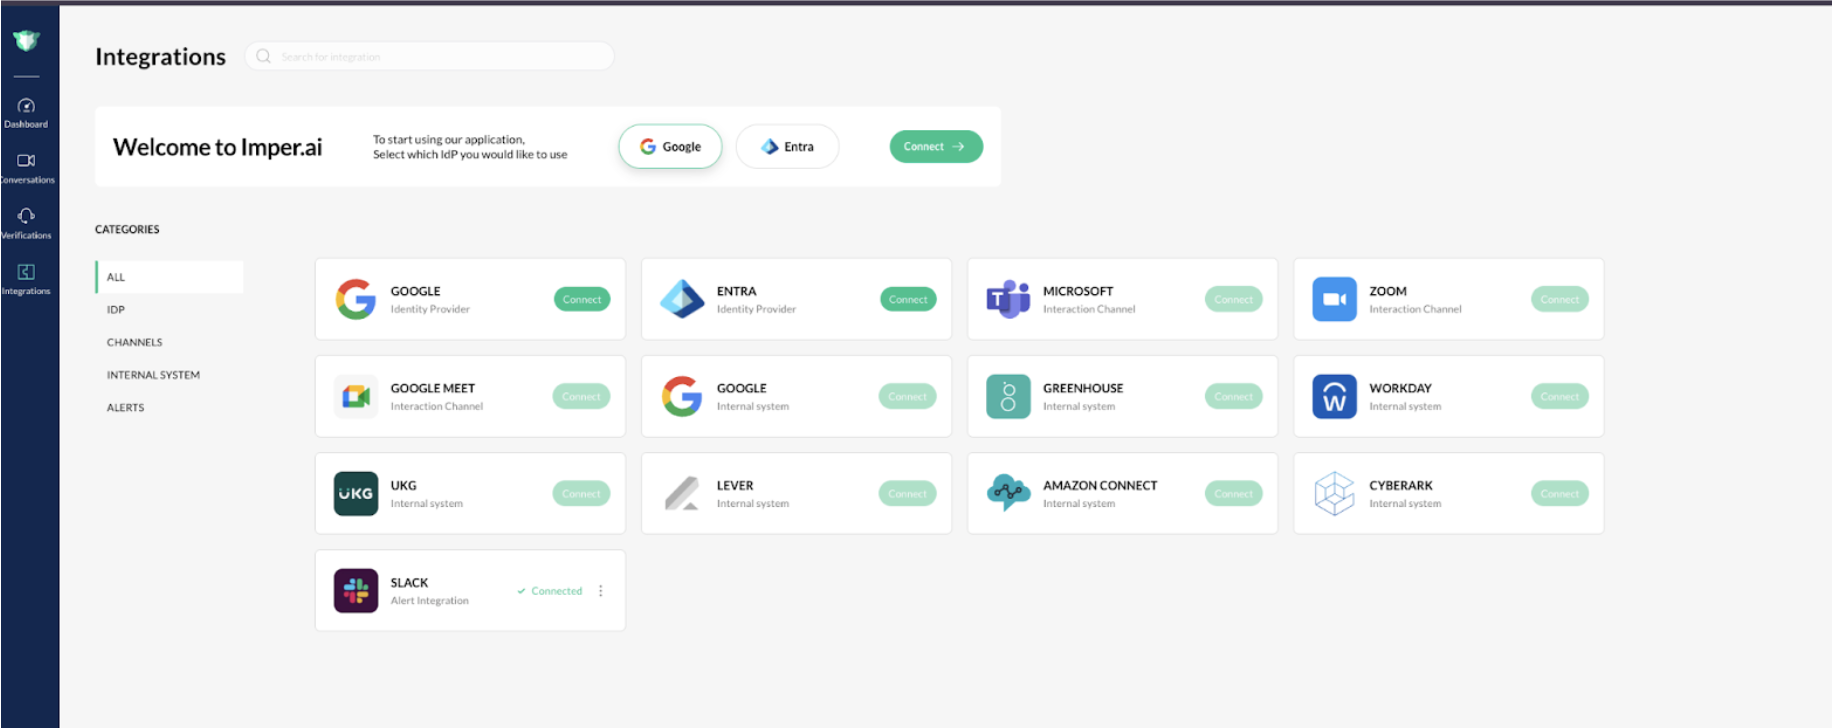
The Zoom integration pop-up window opens.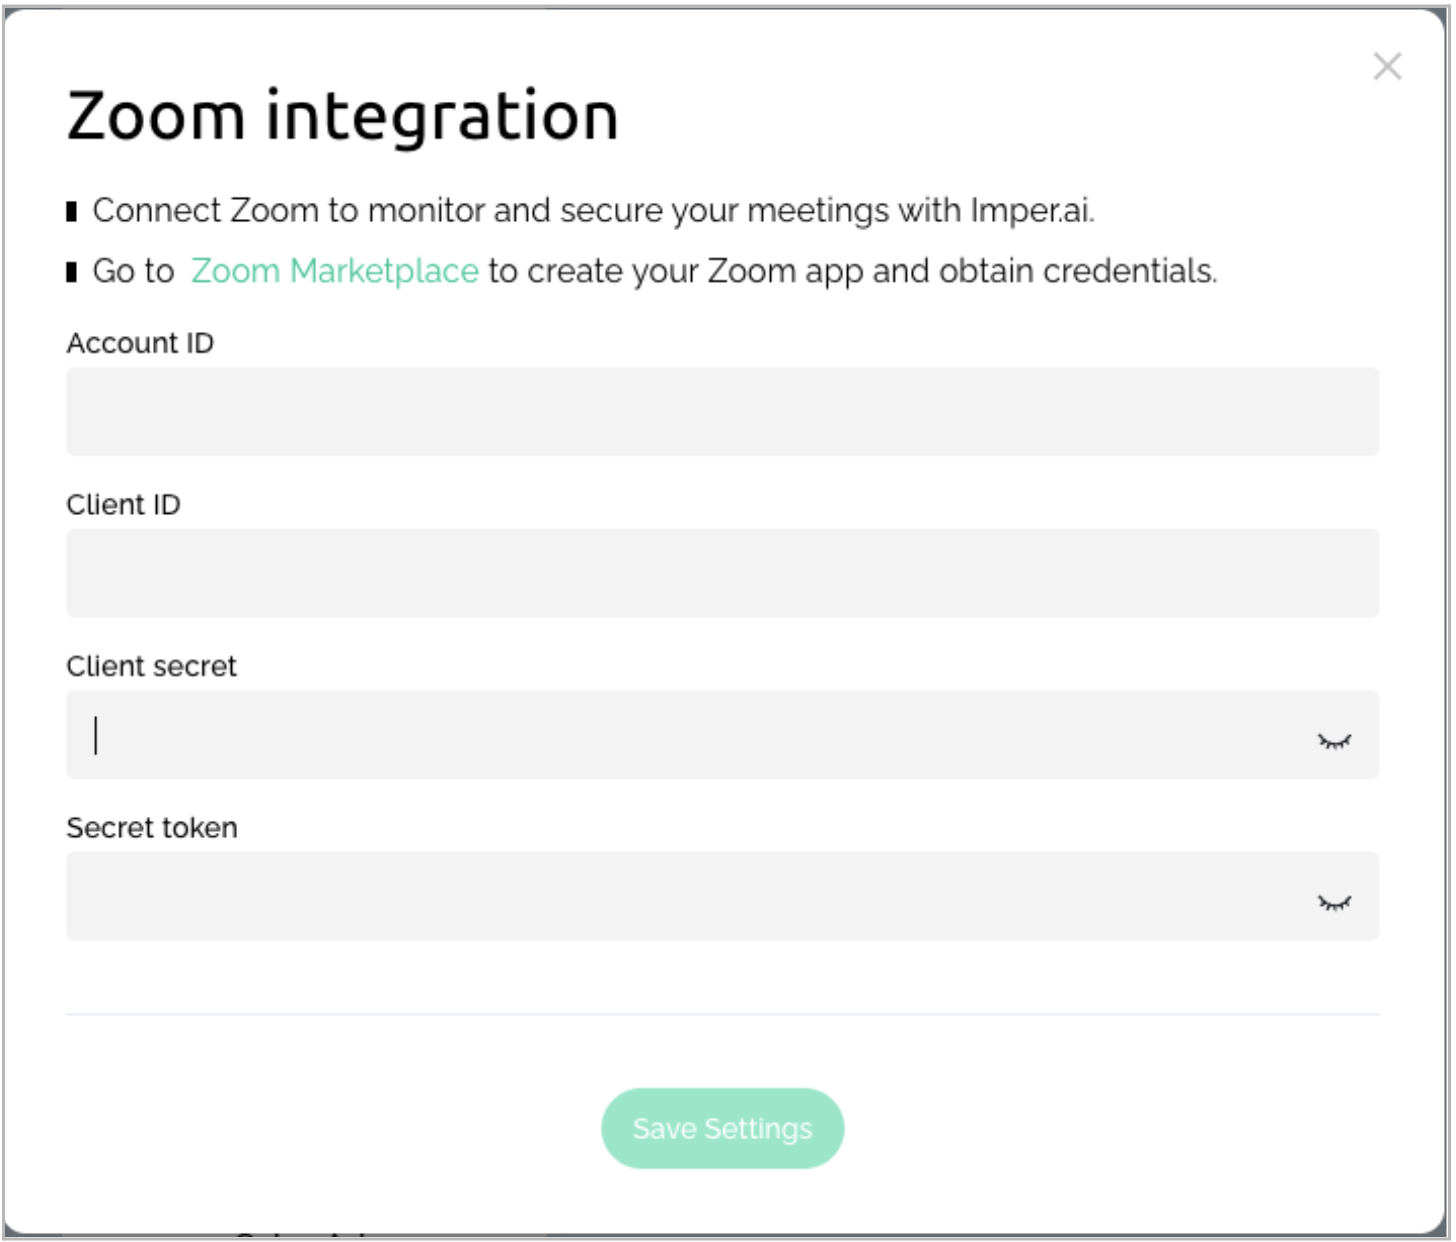
In the pop-up window, click Go to Zoom Marketplace. If prompted, authenticate using the same Zoom admin account.
This redirects you to the Zoom App Marketplace to create the required OAuth app.
Step 2: Create a Server-to-Server OAuth App
In the Zoom App Marketplace, open the top-right menu and select Develop > Build App.

Choose Server-to-Server OAuth App when asked, “What kind of app are you creating?”
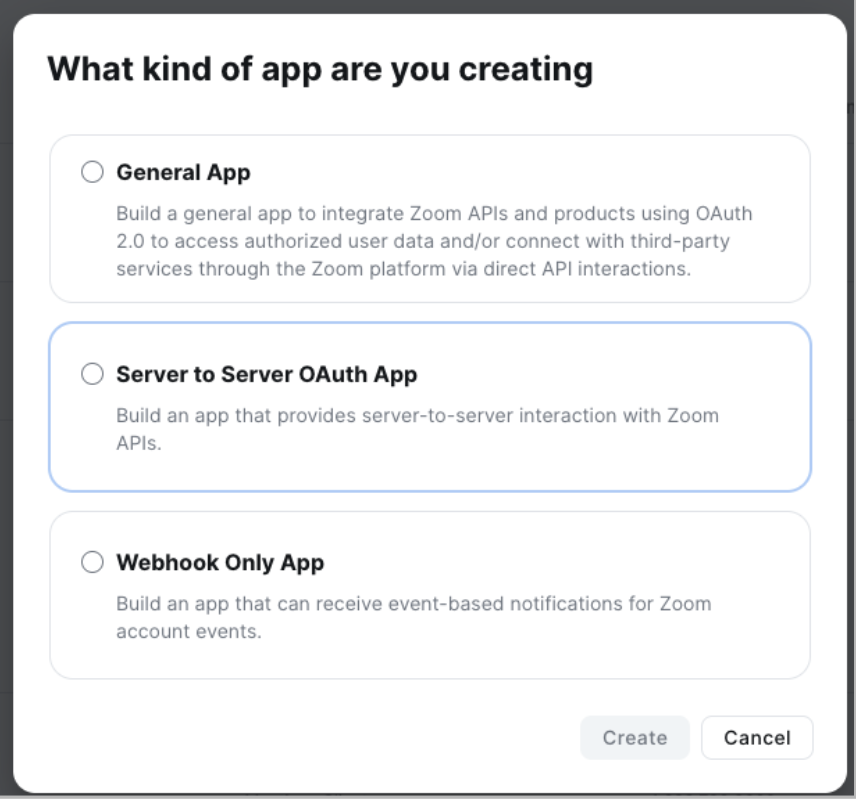
Name the application imper.ai (recommended) and click Next.
You’ll be redirected to the App Credentials tab.
Step 3: Copy Your Credentials to imper.ai
In the App Credentials tab, copy the following and paste them into the corresponding fields in the imper.ai Zoom Connection dialog:
Account ID
Client ID
Client Secret
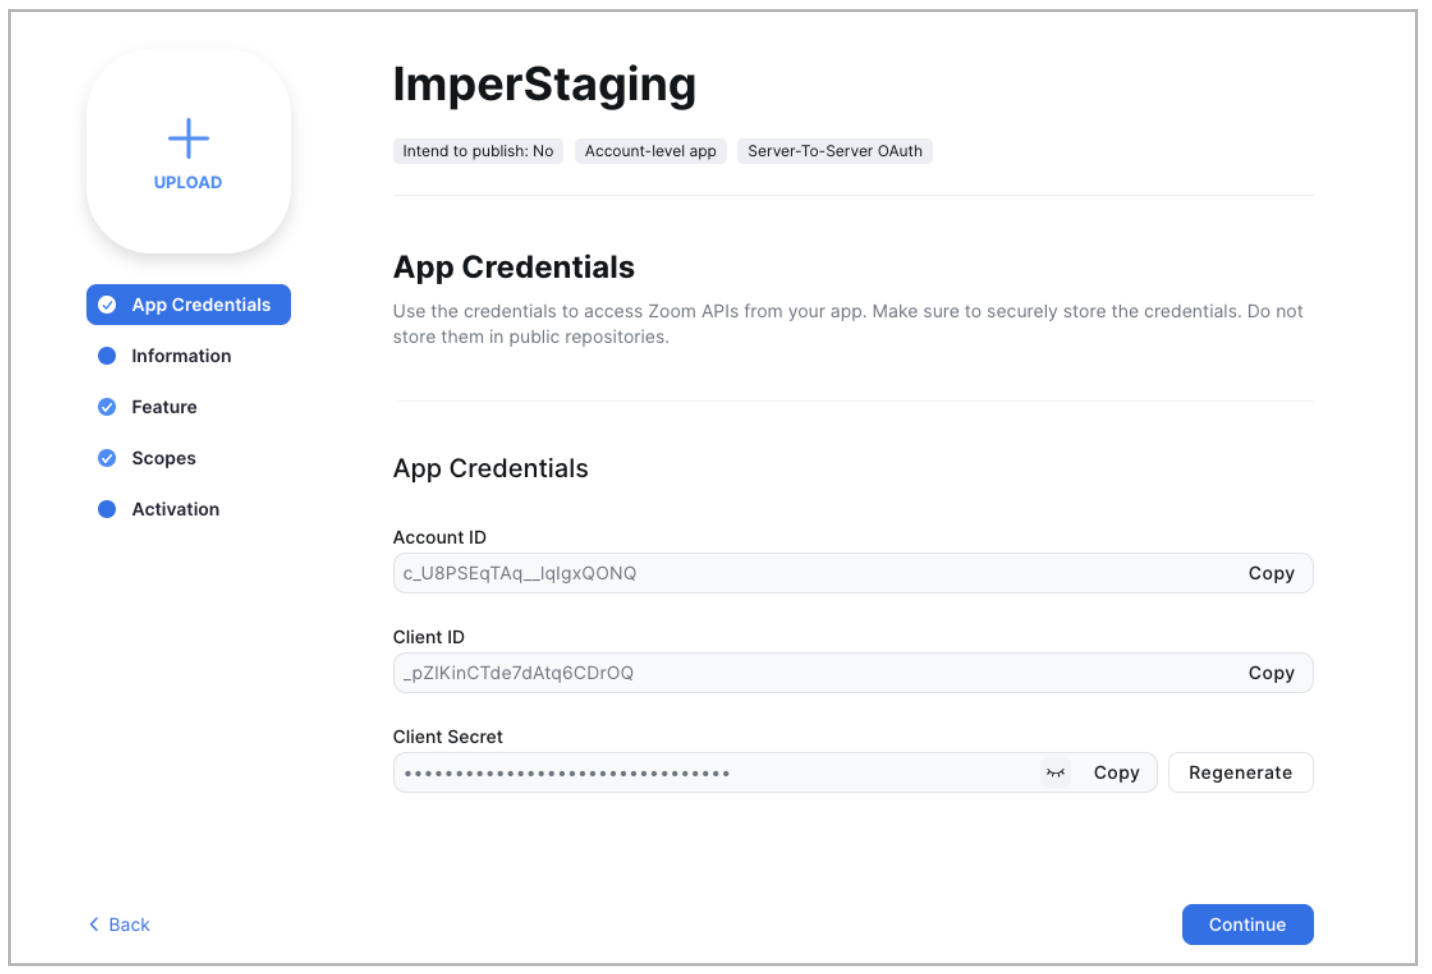
After pasting these into the imperial.ai Zoom Connection dialog, return to Zoom and click Continue.
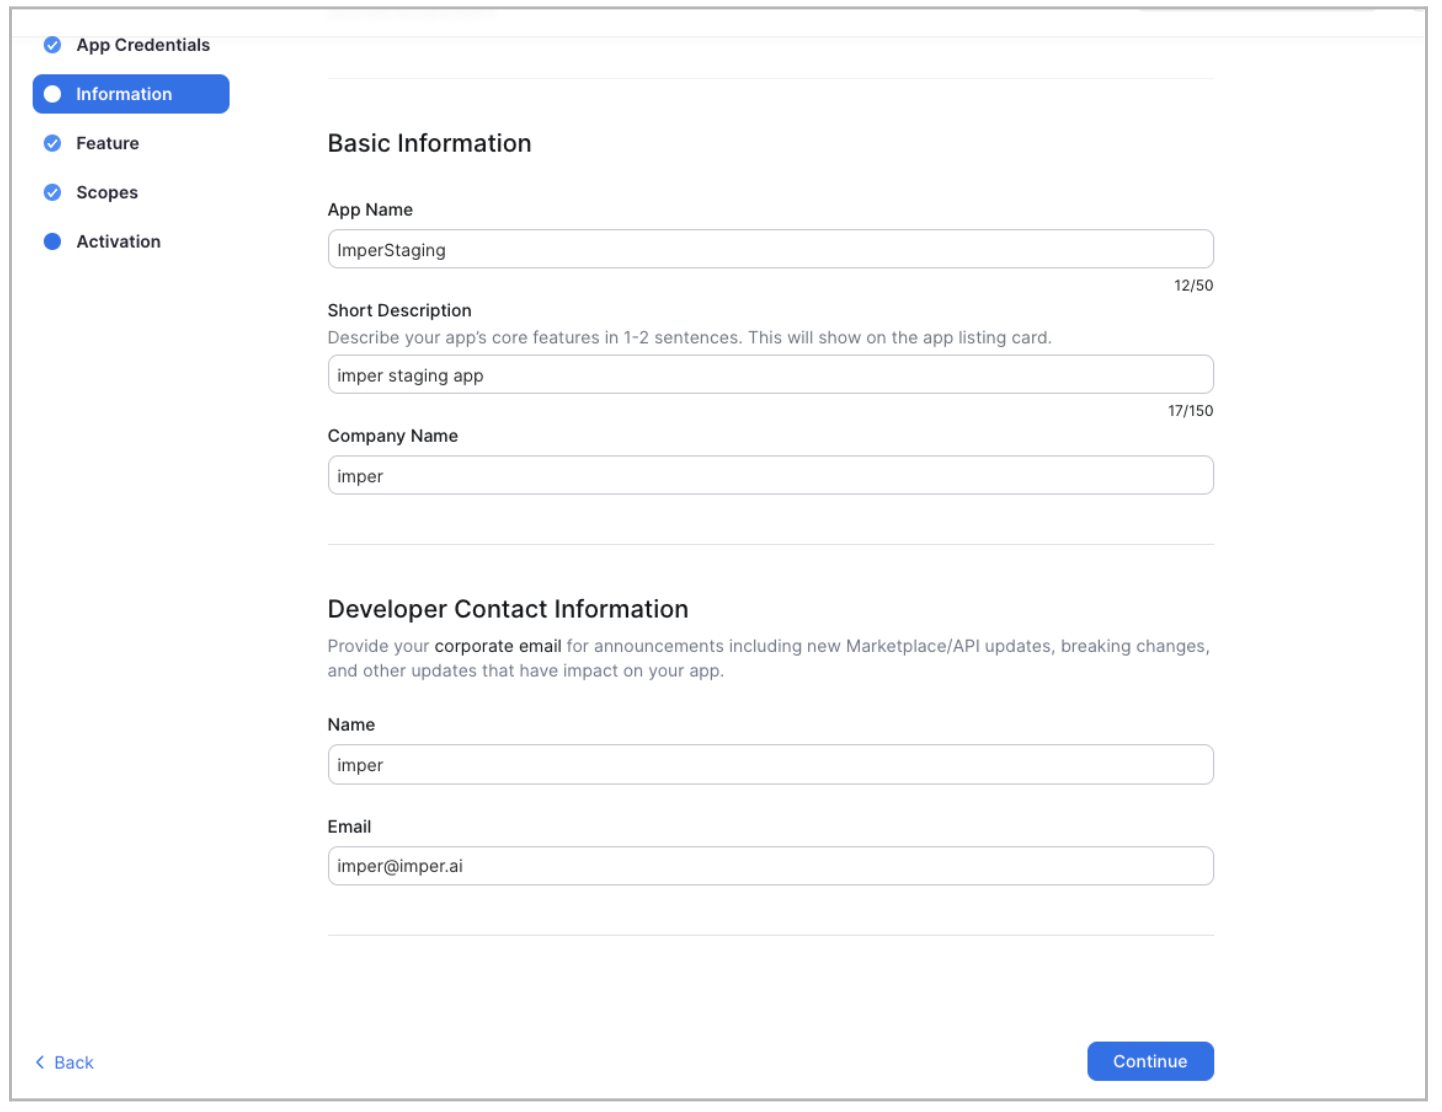
Step 4: Complete the App Setup in Zoom
In the Information tab, fill in the required information and click Continue.
In the Feature tab, Zoom generates a Secret Token.
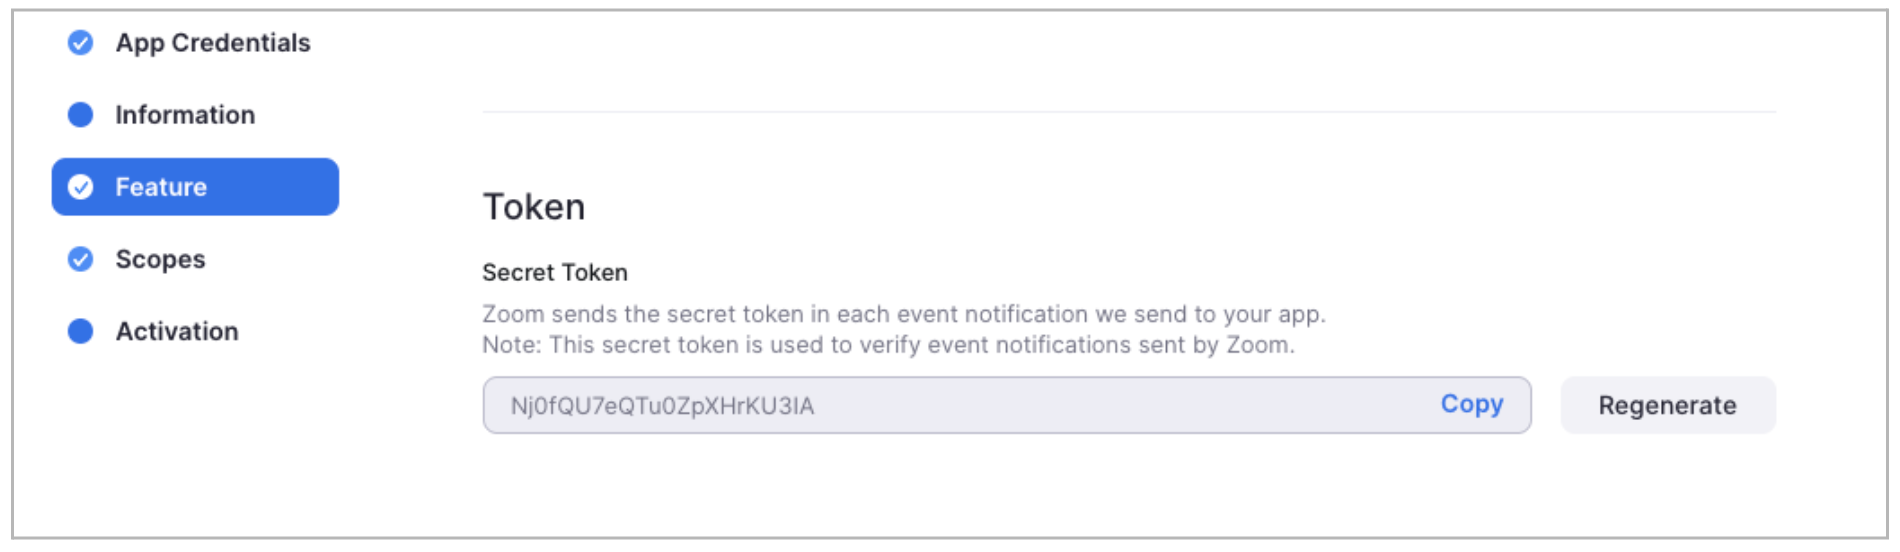
Copy the Secret Token.
Paste it into imper.ai Zoom Connection dialog.
Click Save Settings.
imper.ai will display a second window containing a webhook endpoint URL that must be added inside Zoom.
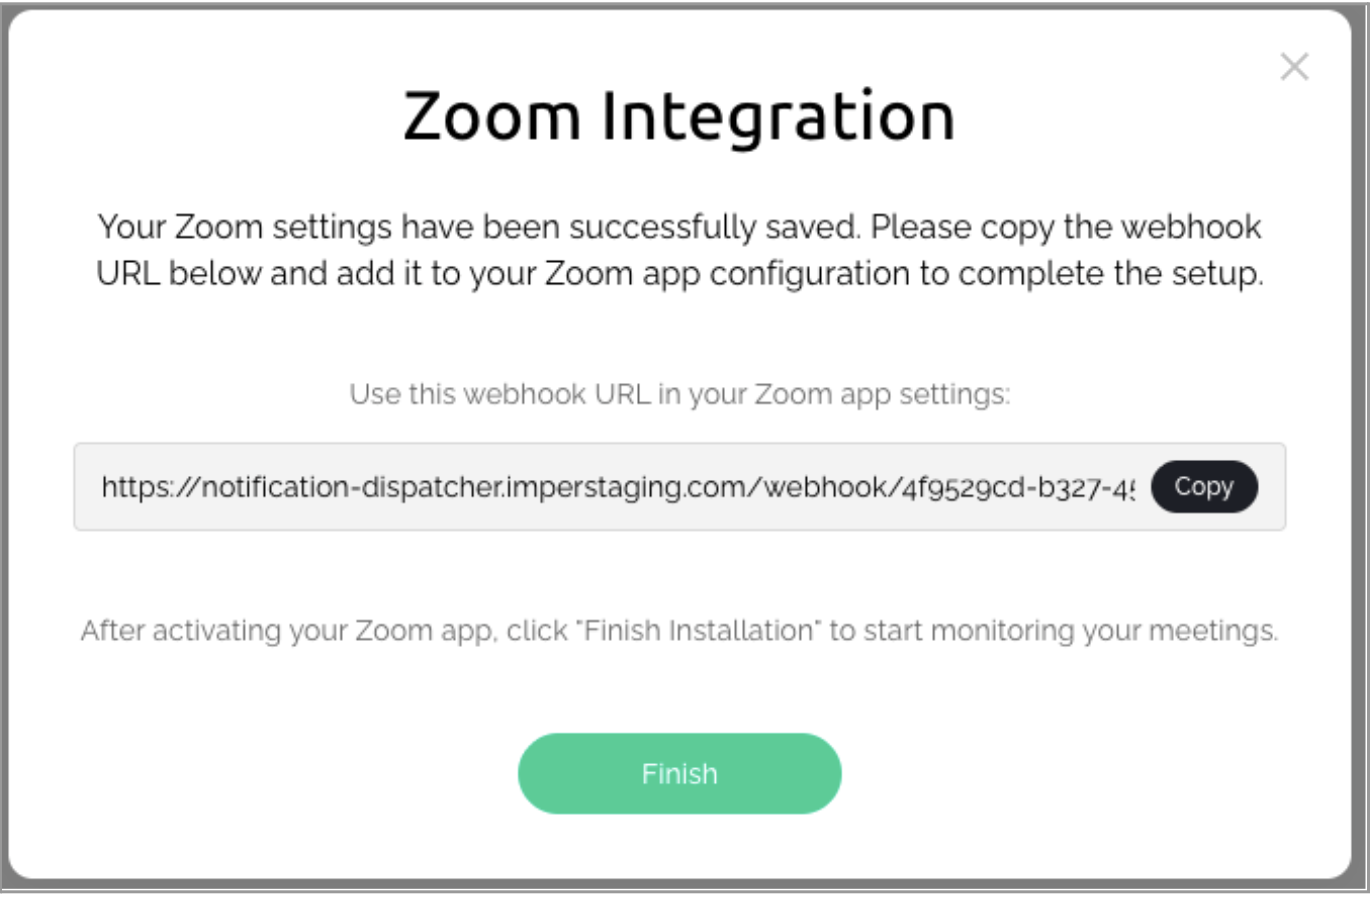
Important
Do not click Finish yet.
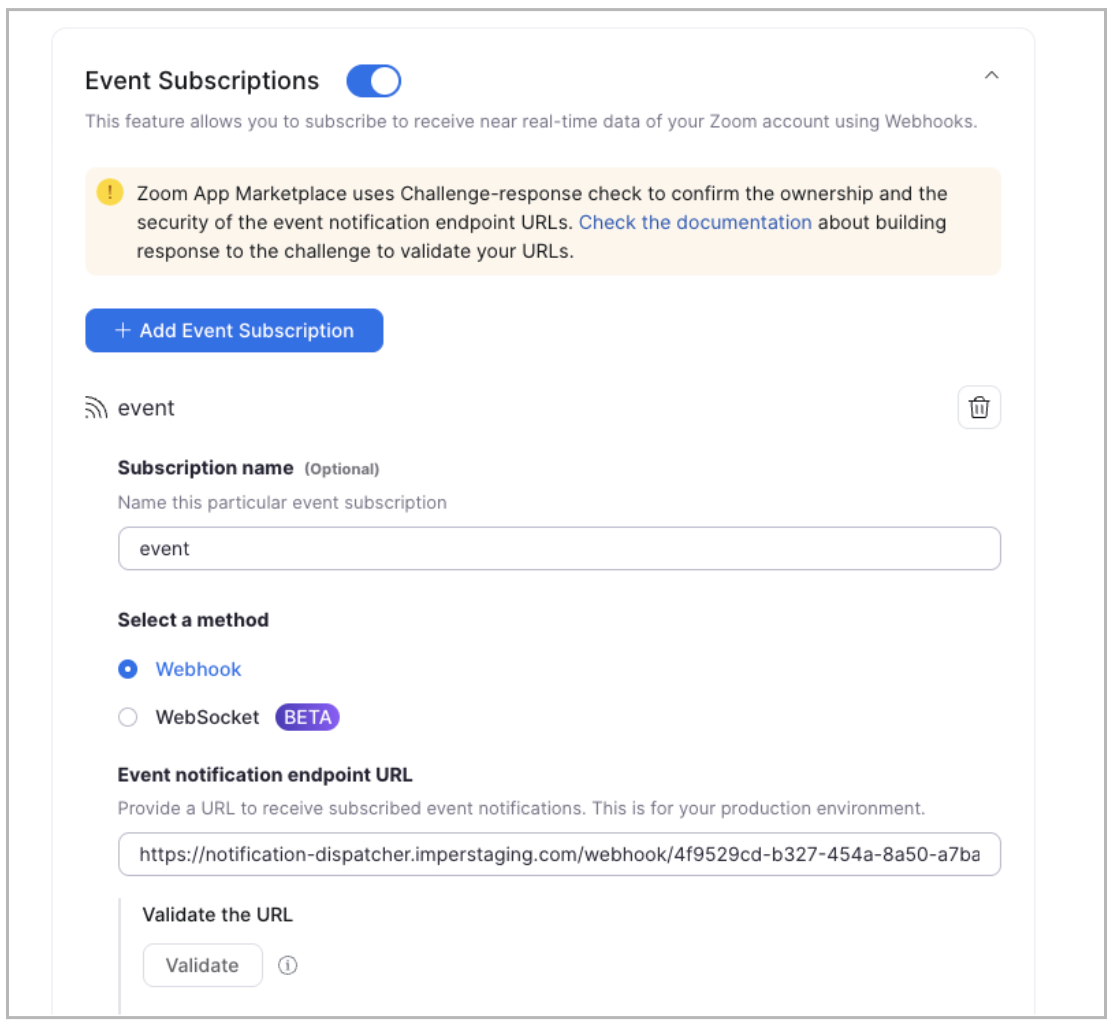
Step 5: Configure Event Subscriptions
In the Zoom App Marketplace, enable Event Subscriptions.
Enter a Subscription name (e.g., imper.ai Webhook).
Choose the Webhook method option.
Paste the webhook endpoint URL shown in imper.ai (from the previous step).
Click Validate.
You should see a Validated badge.
Step 6: Add Required Zoom Event Types
In Event Types, add the following nine Meeting events:
Start Meeting
End Meeting
Participant joined meeting before host
Participant waiting for host to join
Participant/Host joined meeting
Participant/Host left meeting
Meeting has been created
Meeting has been updated
Meeting has been deleted
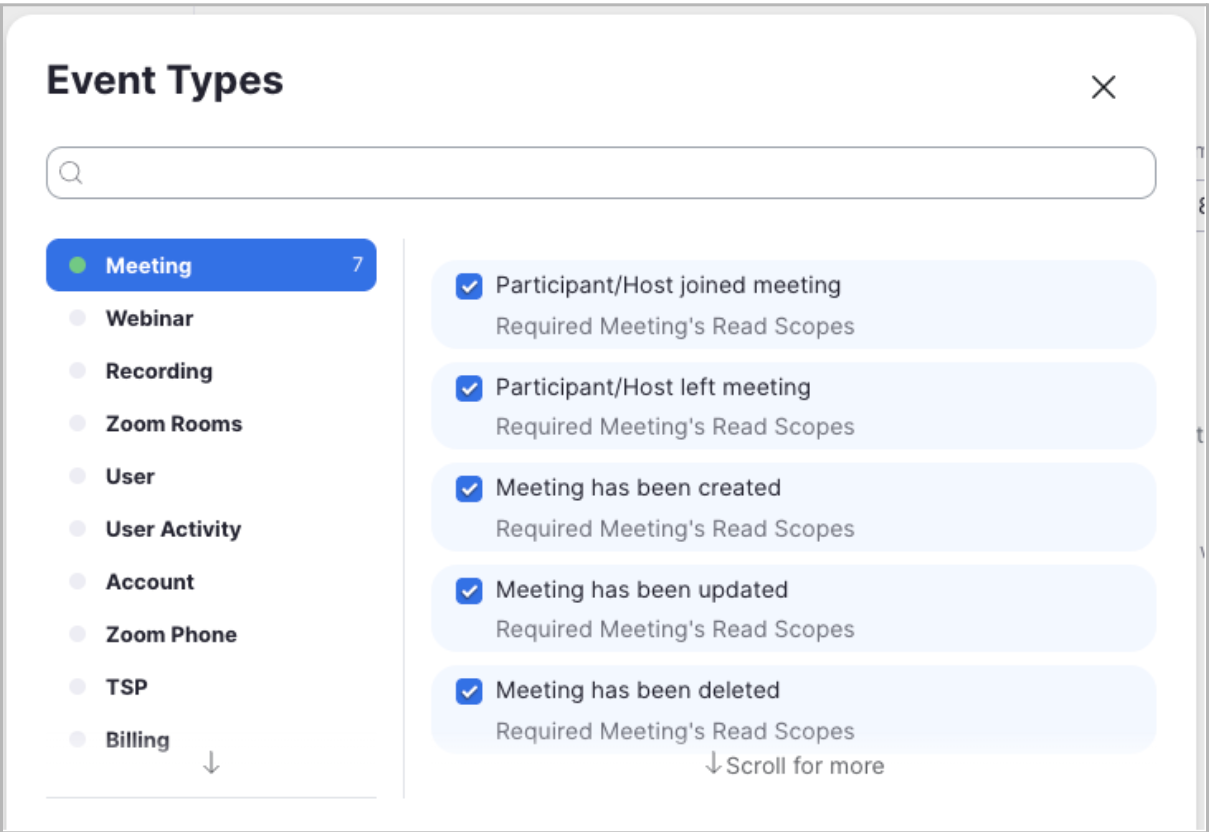
After selecting these events, click Save.
Step 7: Add Required Scopes
In the Scopes section of the app, add the following admin-level scopes:
user:read:list_users:admin
user:read:user:admin
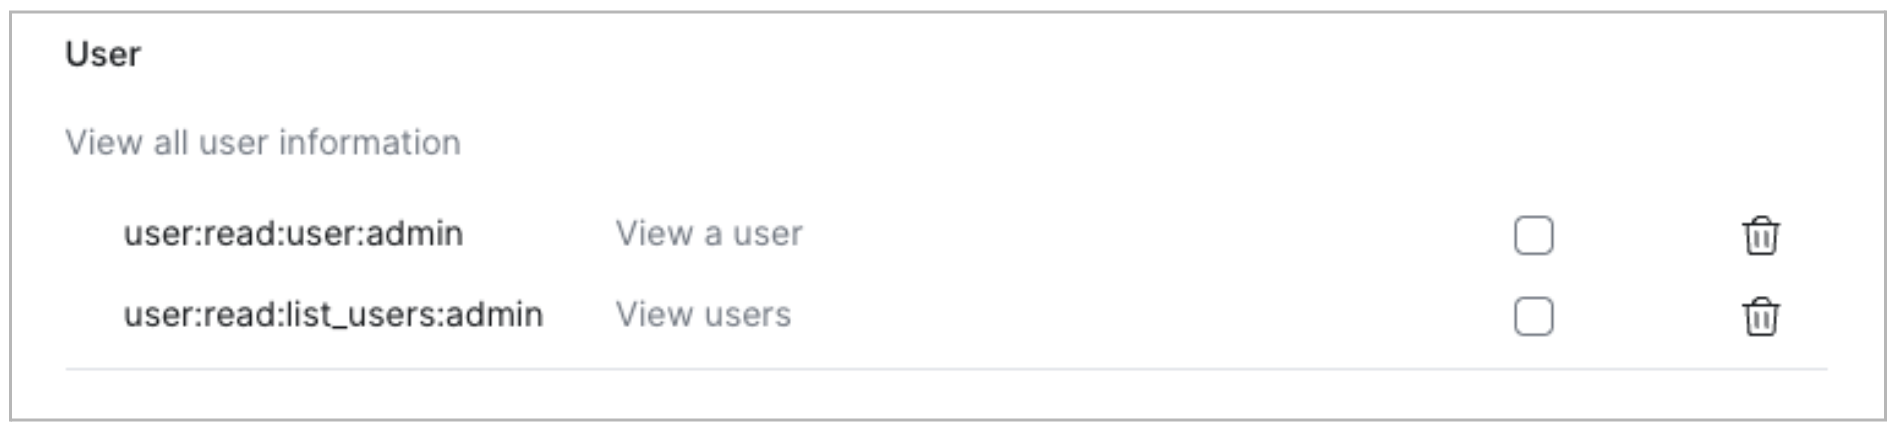
These allow imper.ai to sync user accounts, validate identities, and analyze meeting participation.
For a detailed explanation of each permission and how it is used, see Zoom Permissions.
Step 8: Activate the Zoom App
Activate your Zoom application.
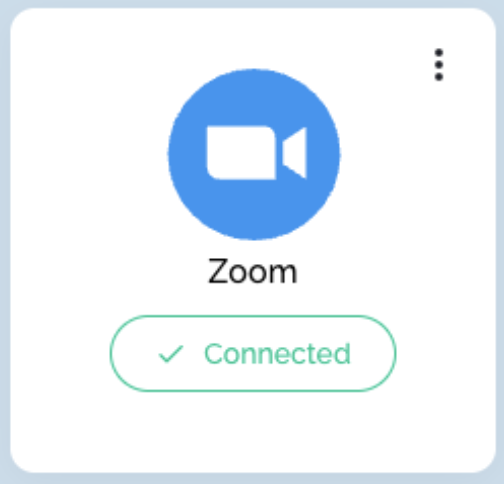
Once activation is confirmed, return to imper.ai and click Finish in the Zoom Connection dialog.

In the imper.ai Integrations page, the Zoom Communication Channel should now appear as Connected.
Integration Complete
Zoom is now successfully connected to imper.ai.
From this point forward:
Zoom meetings are monitored automatically
Participant verification and risk scoring are applied in real time
Results are available in the imper.ai console
Verification and Status
Once users are added:
imper.ai wraps Zoom meeting links created by protected users with a secure verification link
imper.ai begins monitoring Zoom meetings automatically
No additional configuration is required to activate protection
What Happens During a Zoom Meeting
For meetings created by protected users:
A participant clicks the wrapped Zoom meeting link.
imper.ai intercepts the link and initiates verification.
Identity and contextual signals are evaluated in real time.
After verification, the participant is redirected to the Zoom meeting.
Verification results and meeting activity are available in the imper.ai console.
Validate the Deployment
Create a test Zoom meeting.
Verify that the meeting link is wrapped by imper.ai.
Confirm that participants are redirected to the verification flow.
Review meeting status and activity in the imper.ai console.
Next Steps
After validating the deployment, manage protected users, investigate monitored meetings, and respond to risk using Communication Channel Protection.