
Appearance
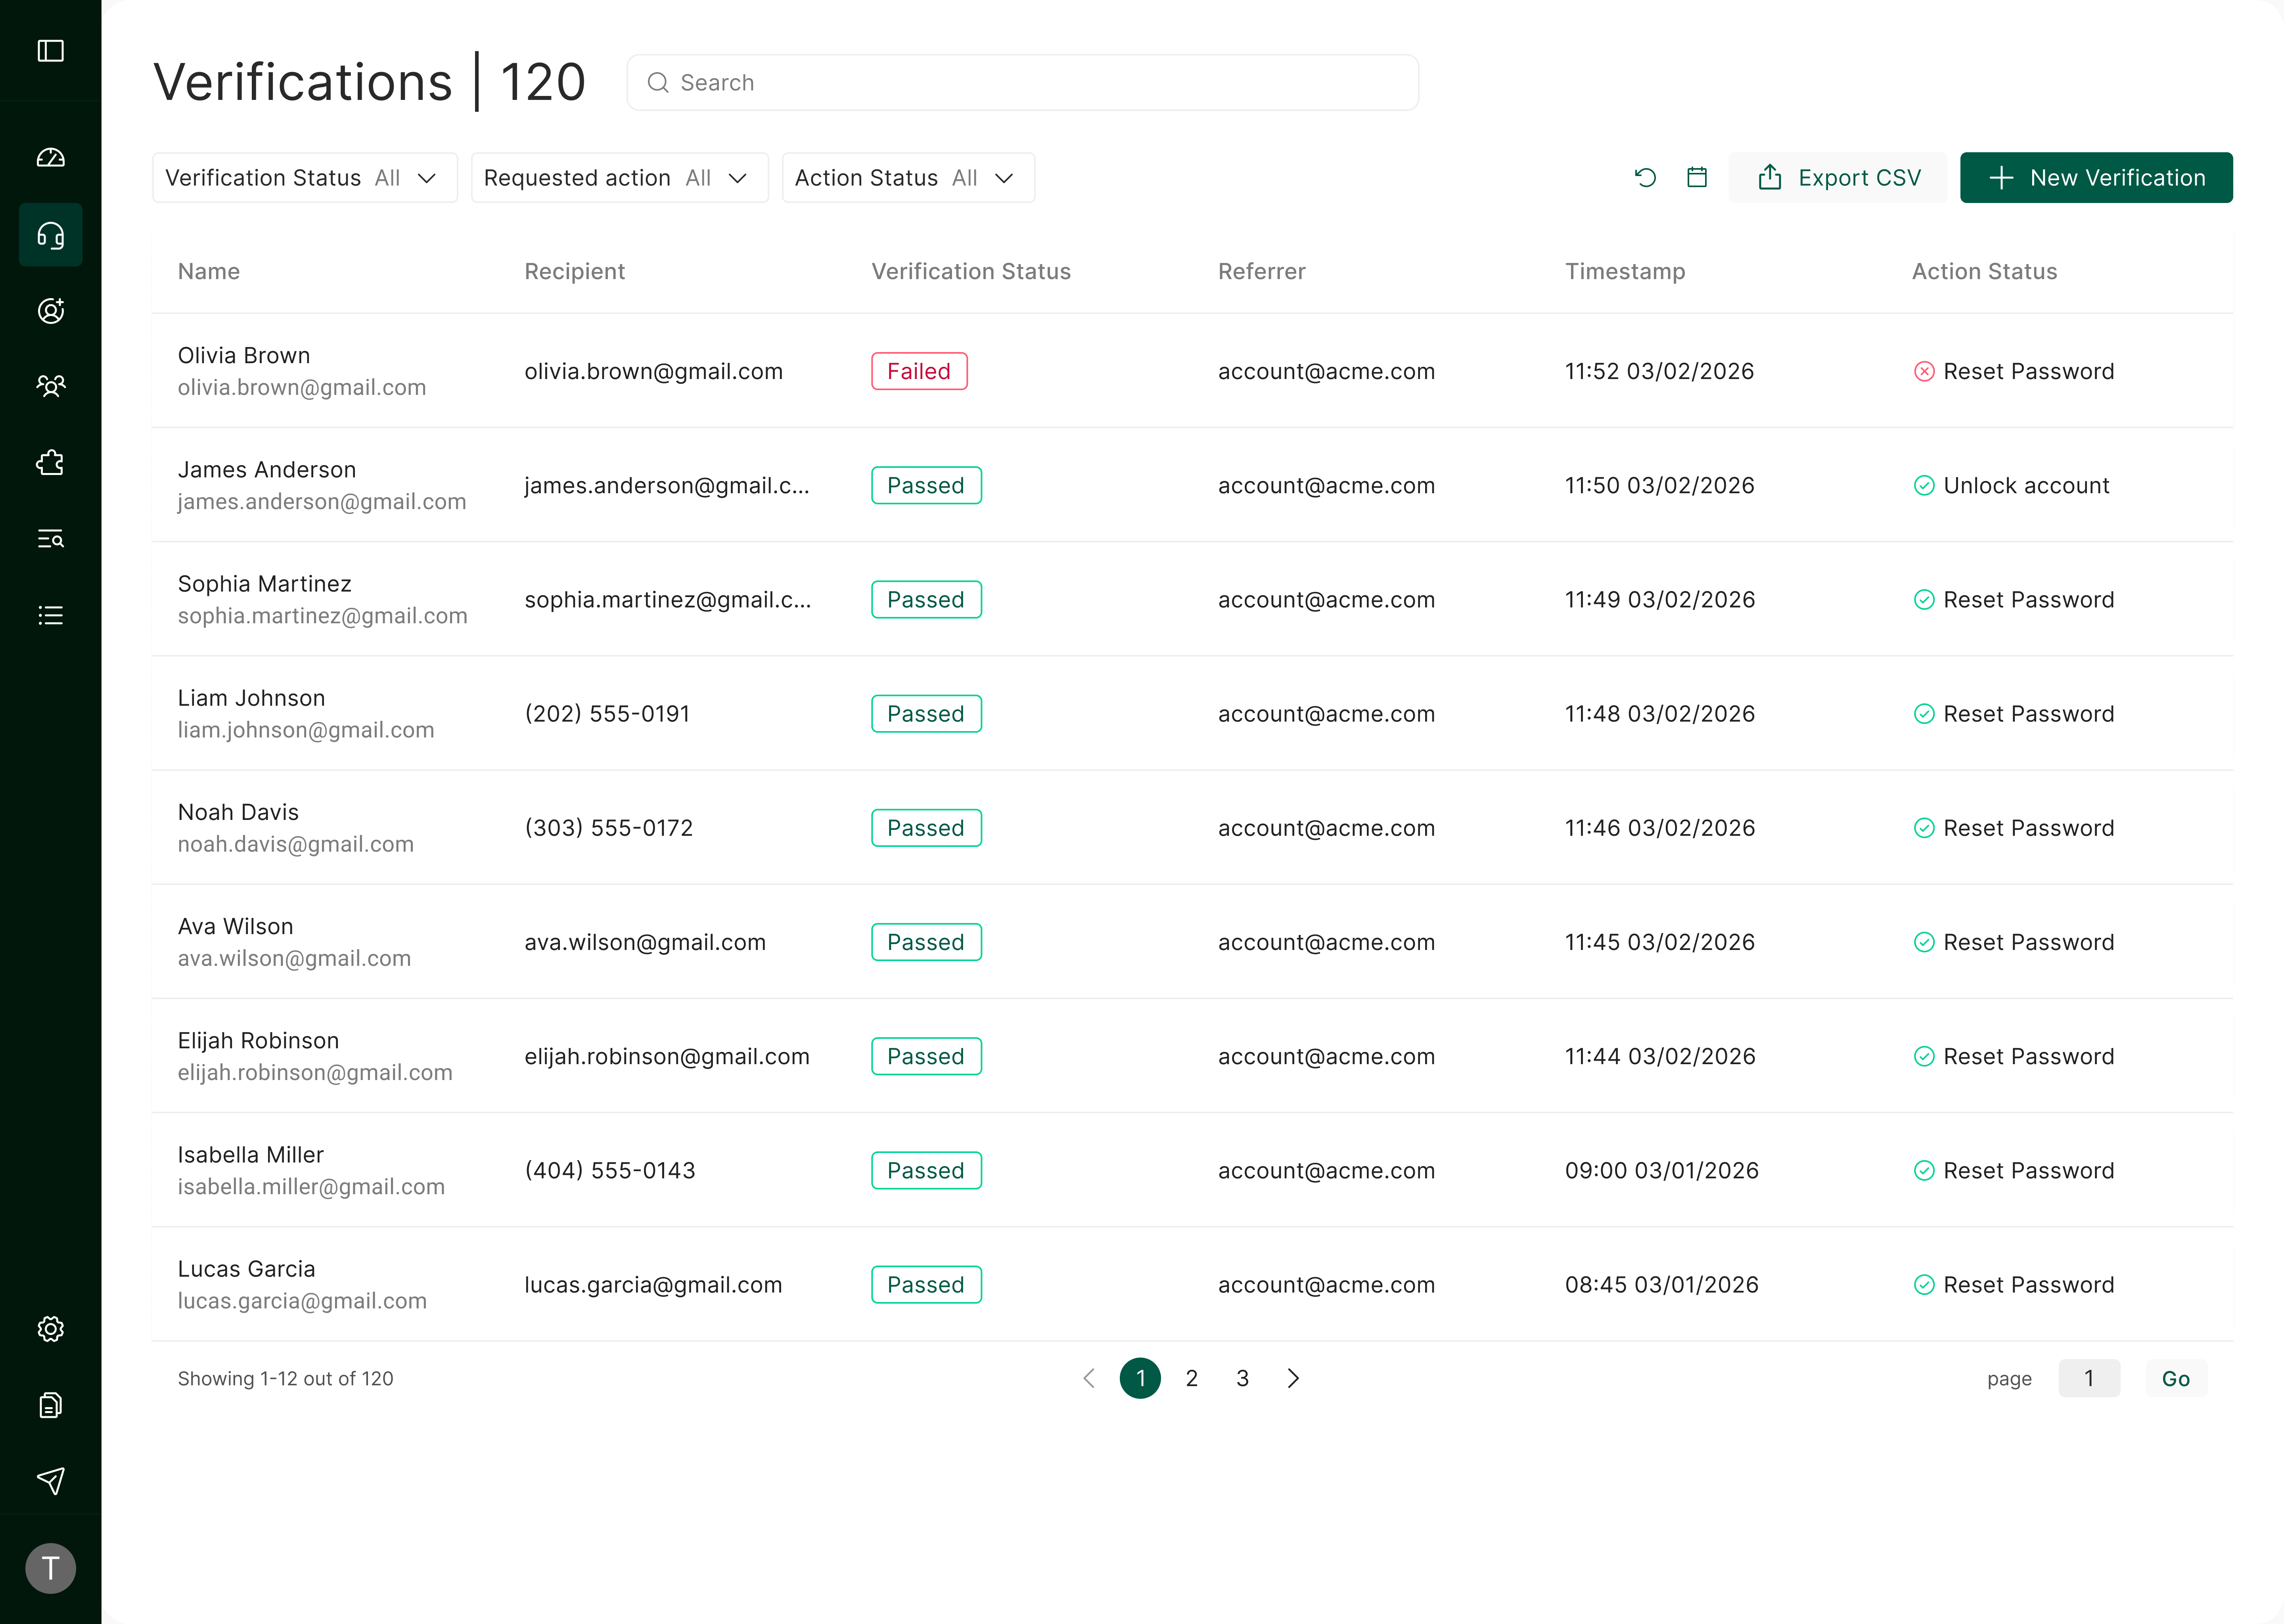
The Verifications Page provides administrators and help desk agents with complete visibility into all helpdesk-initiated identity verification attempts. Each record includes participant details, risk scoring, verification outcome, timestamps, the referrer (the help desk agent who initiated the verification flow), and the status of the action the user performed at the end of the verification (for example, whether a password reset succeeded, failed, or still requires assistance).
This is the central operational view for help desk-driven identity validation and is used prior to sensitive actions such as password resets, account recovery, and fraud investigation.
Main Verifications Page View
Page Header and Controls
At the top of the page, the following controls appear:
| Control | Description |
|---|---|
| Verification Count | The total number of records (for example, Helpdesk Verifications | 80). |
| Search Bar | Free-text search by participant email, referrer, or status. |
| Filters | Refine results by Risk Score slider (0–10), Participant Email, Status (Passed, Failed, Timed Out, Not Enough Questions), Referrer, and Date Range (with Apply / Reset). Expired verifications are filtered out automatically.* |
| Quick Actions | Send Verification Portal Link, Export CSV, and Refresh Table. |
* An expired verification is a verification link that was sent to a user but never opened or completed before it expired.
These controls enable fast triage, record lookup, and audit reviews.
Verification Table Columns
Each row in the table represents a single verification attempt. Columns include:
| Column | Description |
|---|---|
| Participant Email | The email address of the individual who completed or attempted a verification. |
| Name | The full name of the participant. |
| Risk Score | A numeric score (0–10) that indicates the overall verification risk. Higher values represent increased risk. |
| Status | The final outcome of the verification: Passed , Failed , Timed Out , or Not Enough Questions. |
| Referrer | Identifies who initiated or referred the verification, when applicable. |
| Timestamp | The date and time when the verification was completed. |
| Actions Status | The action the user performed (for example, Reset password) shown with an icon that reflects its status. Hover over the cell to see a tooltip with the status. Shows one of the values listed below. |
Actions Status Values
When an action was performed, the cell shows the name of the action - for example, Unlock account, Set password, or Reset password - together with an icon that reflects its status. The icon is one of the following:
| Icon status | Meaning |
|---|---|
| Success | The action completed successfully. |
| Failed | The action did not complete successfully. |
| Assistance required | The user reported that they still require assistance. |
If no action was performed, the cell shows one of these two statuses instead of an action name:
| Status | Meaning |
|---|---|
| Action incomplete | No action was completed within 5 minutes of the verification. |
| Pending | The action has not been completed yet. |
NOTE
The Actions Status column appears only when actions are configured for your tenant. If no actions are configured, the column is hidden.
Filtering and Searching
Users can filter records by:
Participant Email
Name
Risk Score range
Verification Status
Referrer email
Timestamp
Actions Status - filter by Action successful, Action failed, or Assistance required
Action type - filter by the specific action (for example, Reset password or Unlock account). Only the actions available for your tenant appear.
Expired toggle - show or hide expired verifications. Expired verifications are hidden by default; turn the toggle on to include them in the table.*
Filters allow help desk teams to quickly isolate high-risk events, incomplete verifications, or cases initiated by a specific agent.
Sending a Verification Portal Link
Agents can initiate a verification flow for any user who must prove their identity before a sensitive action (such as a password reset, account recovery, elevated-access request, or suspicious-activity check). The user receives a secure link via SMS or email and completes verification in the Self-Service Portal (SSP).
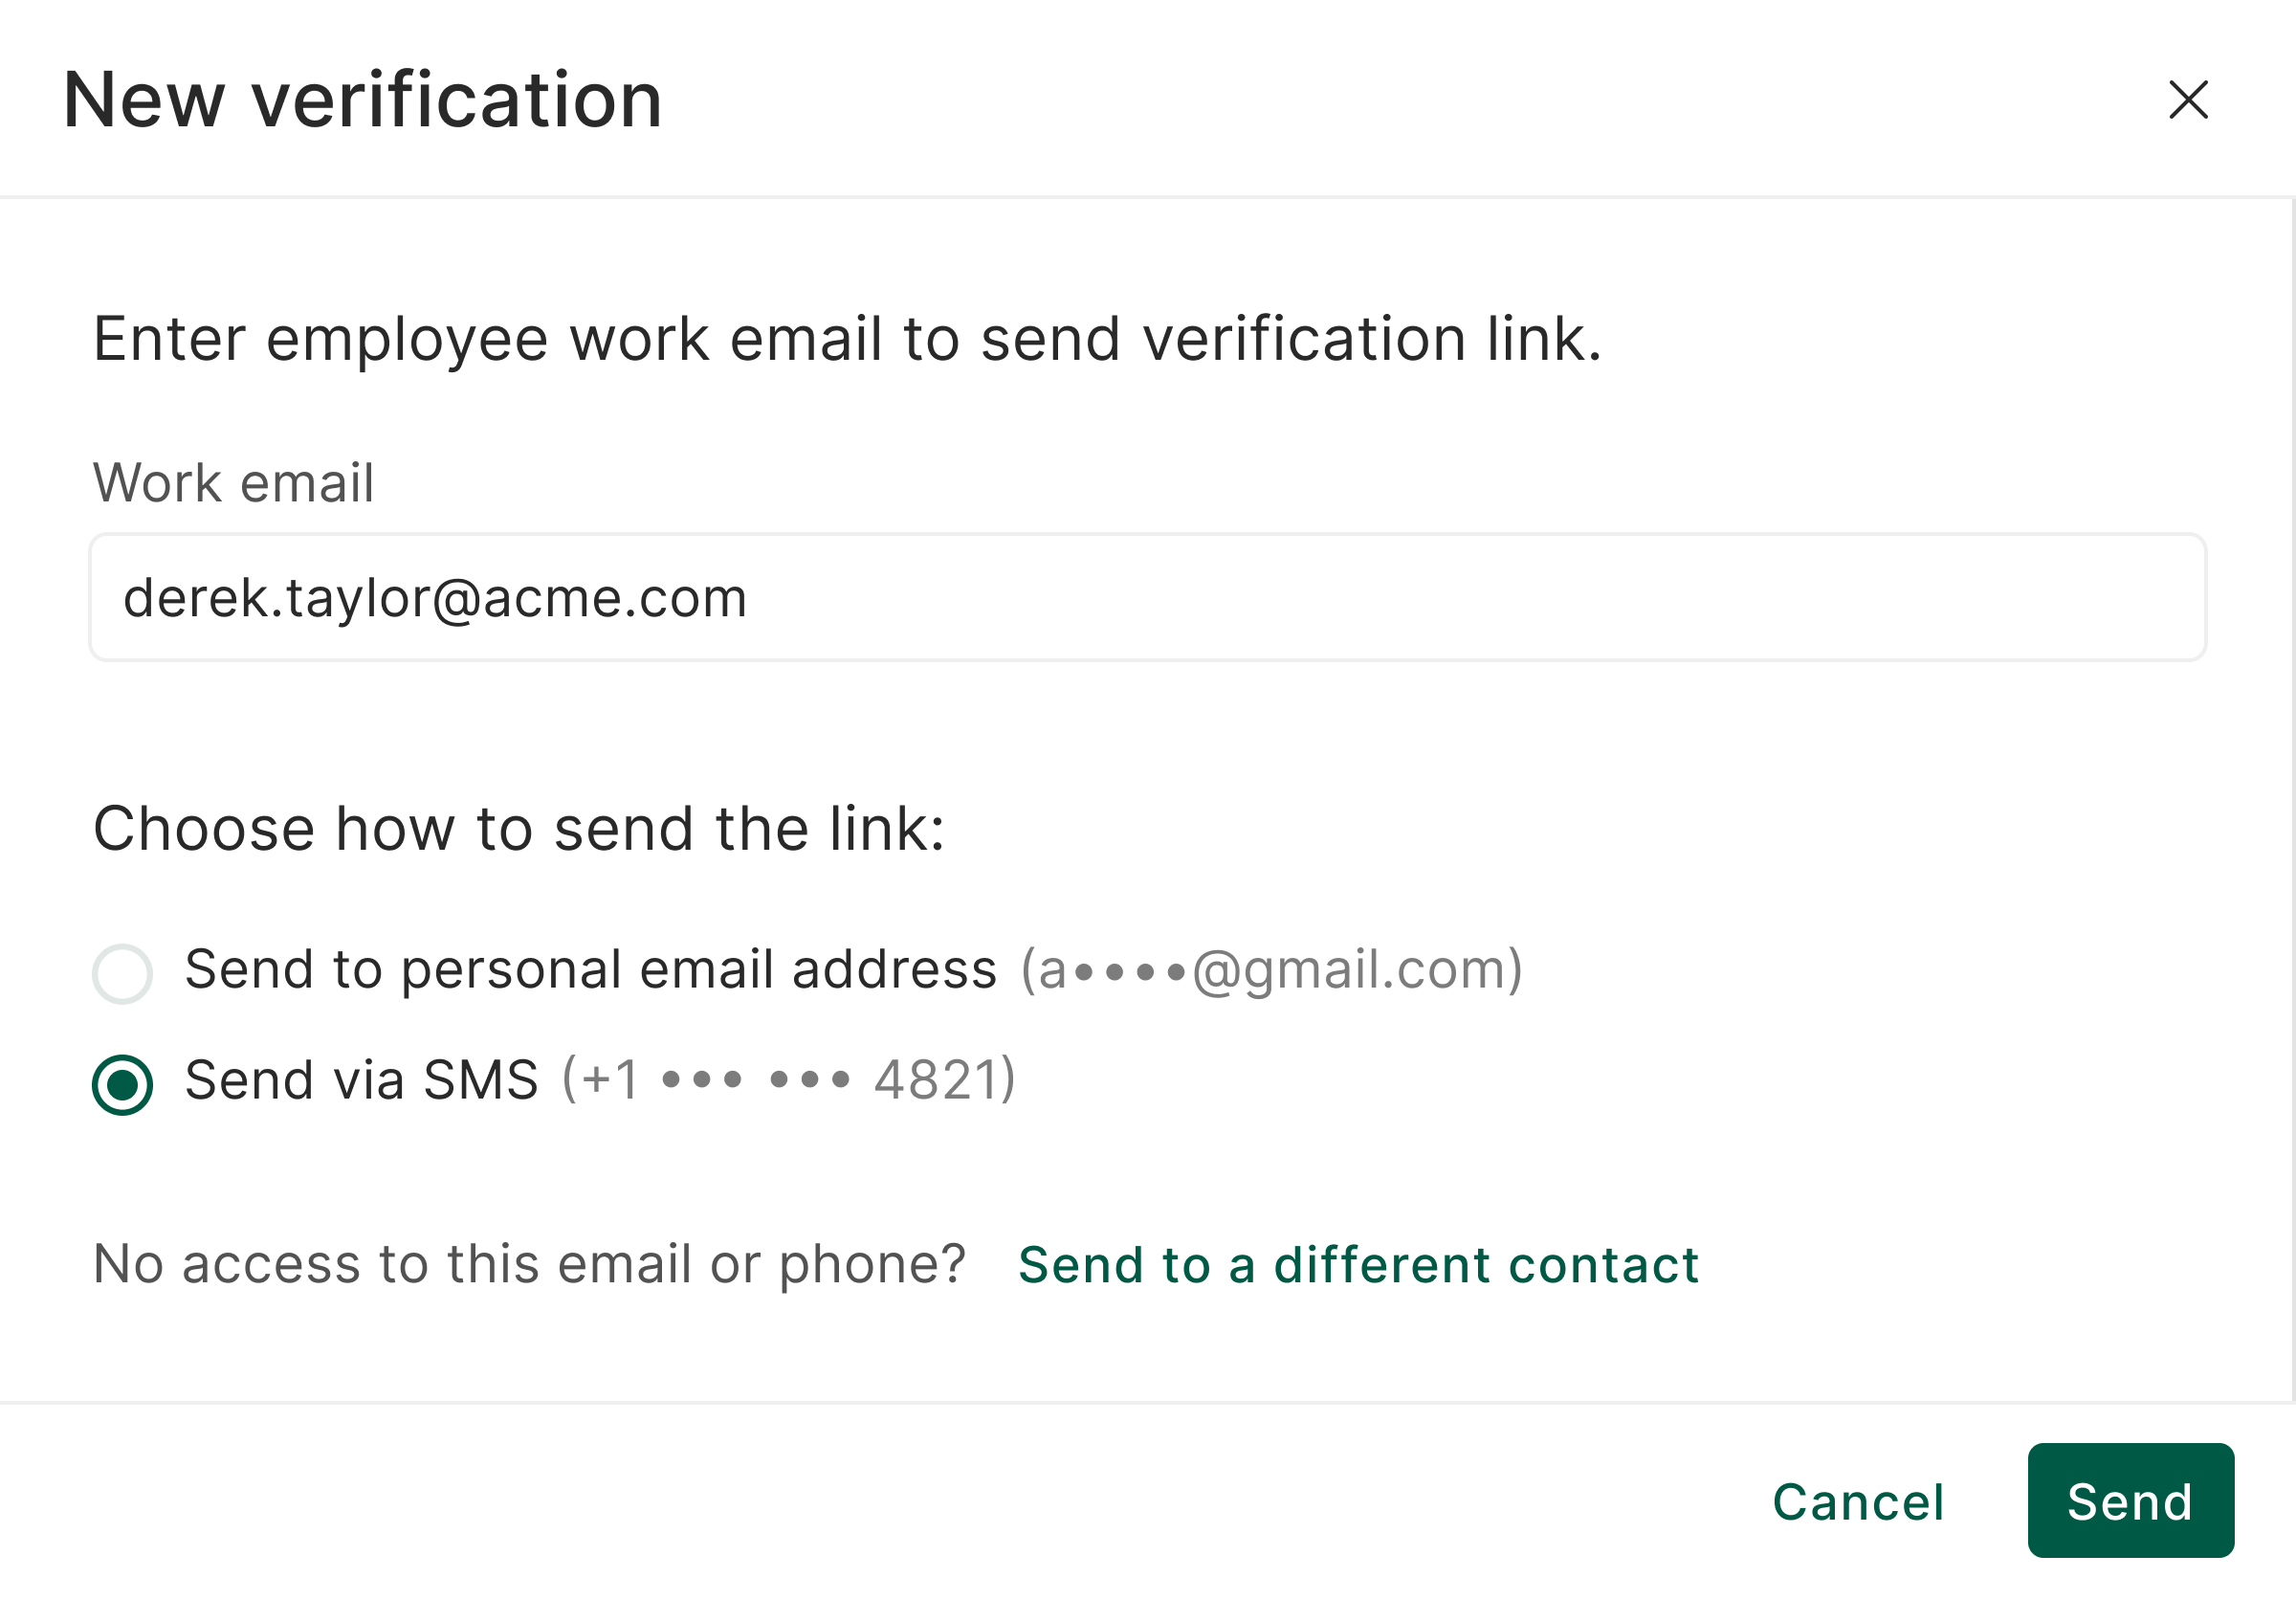
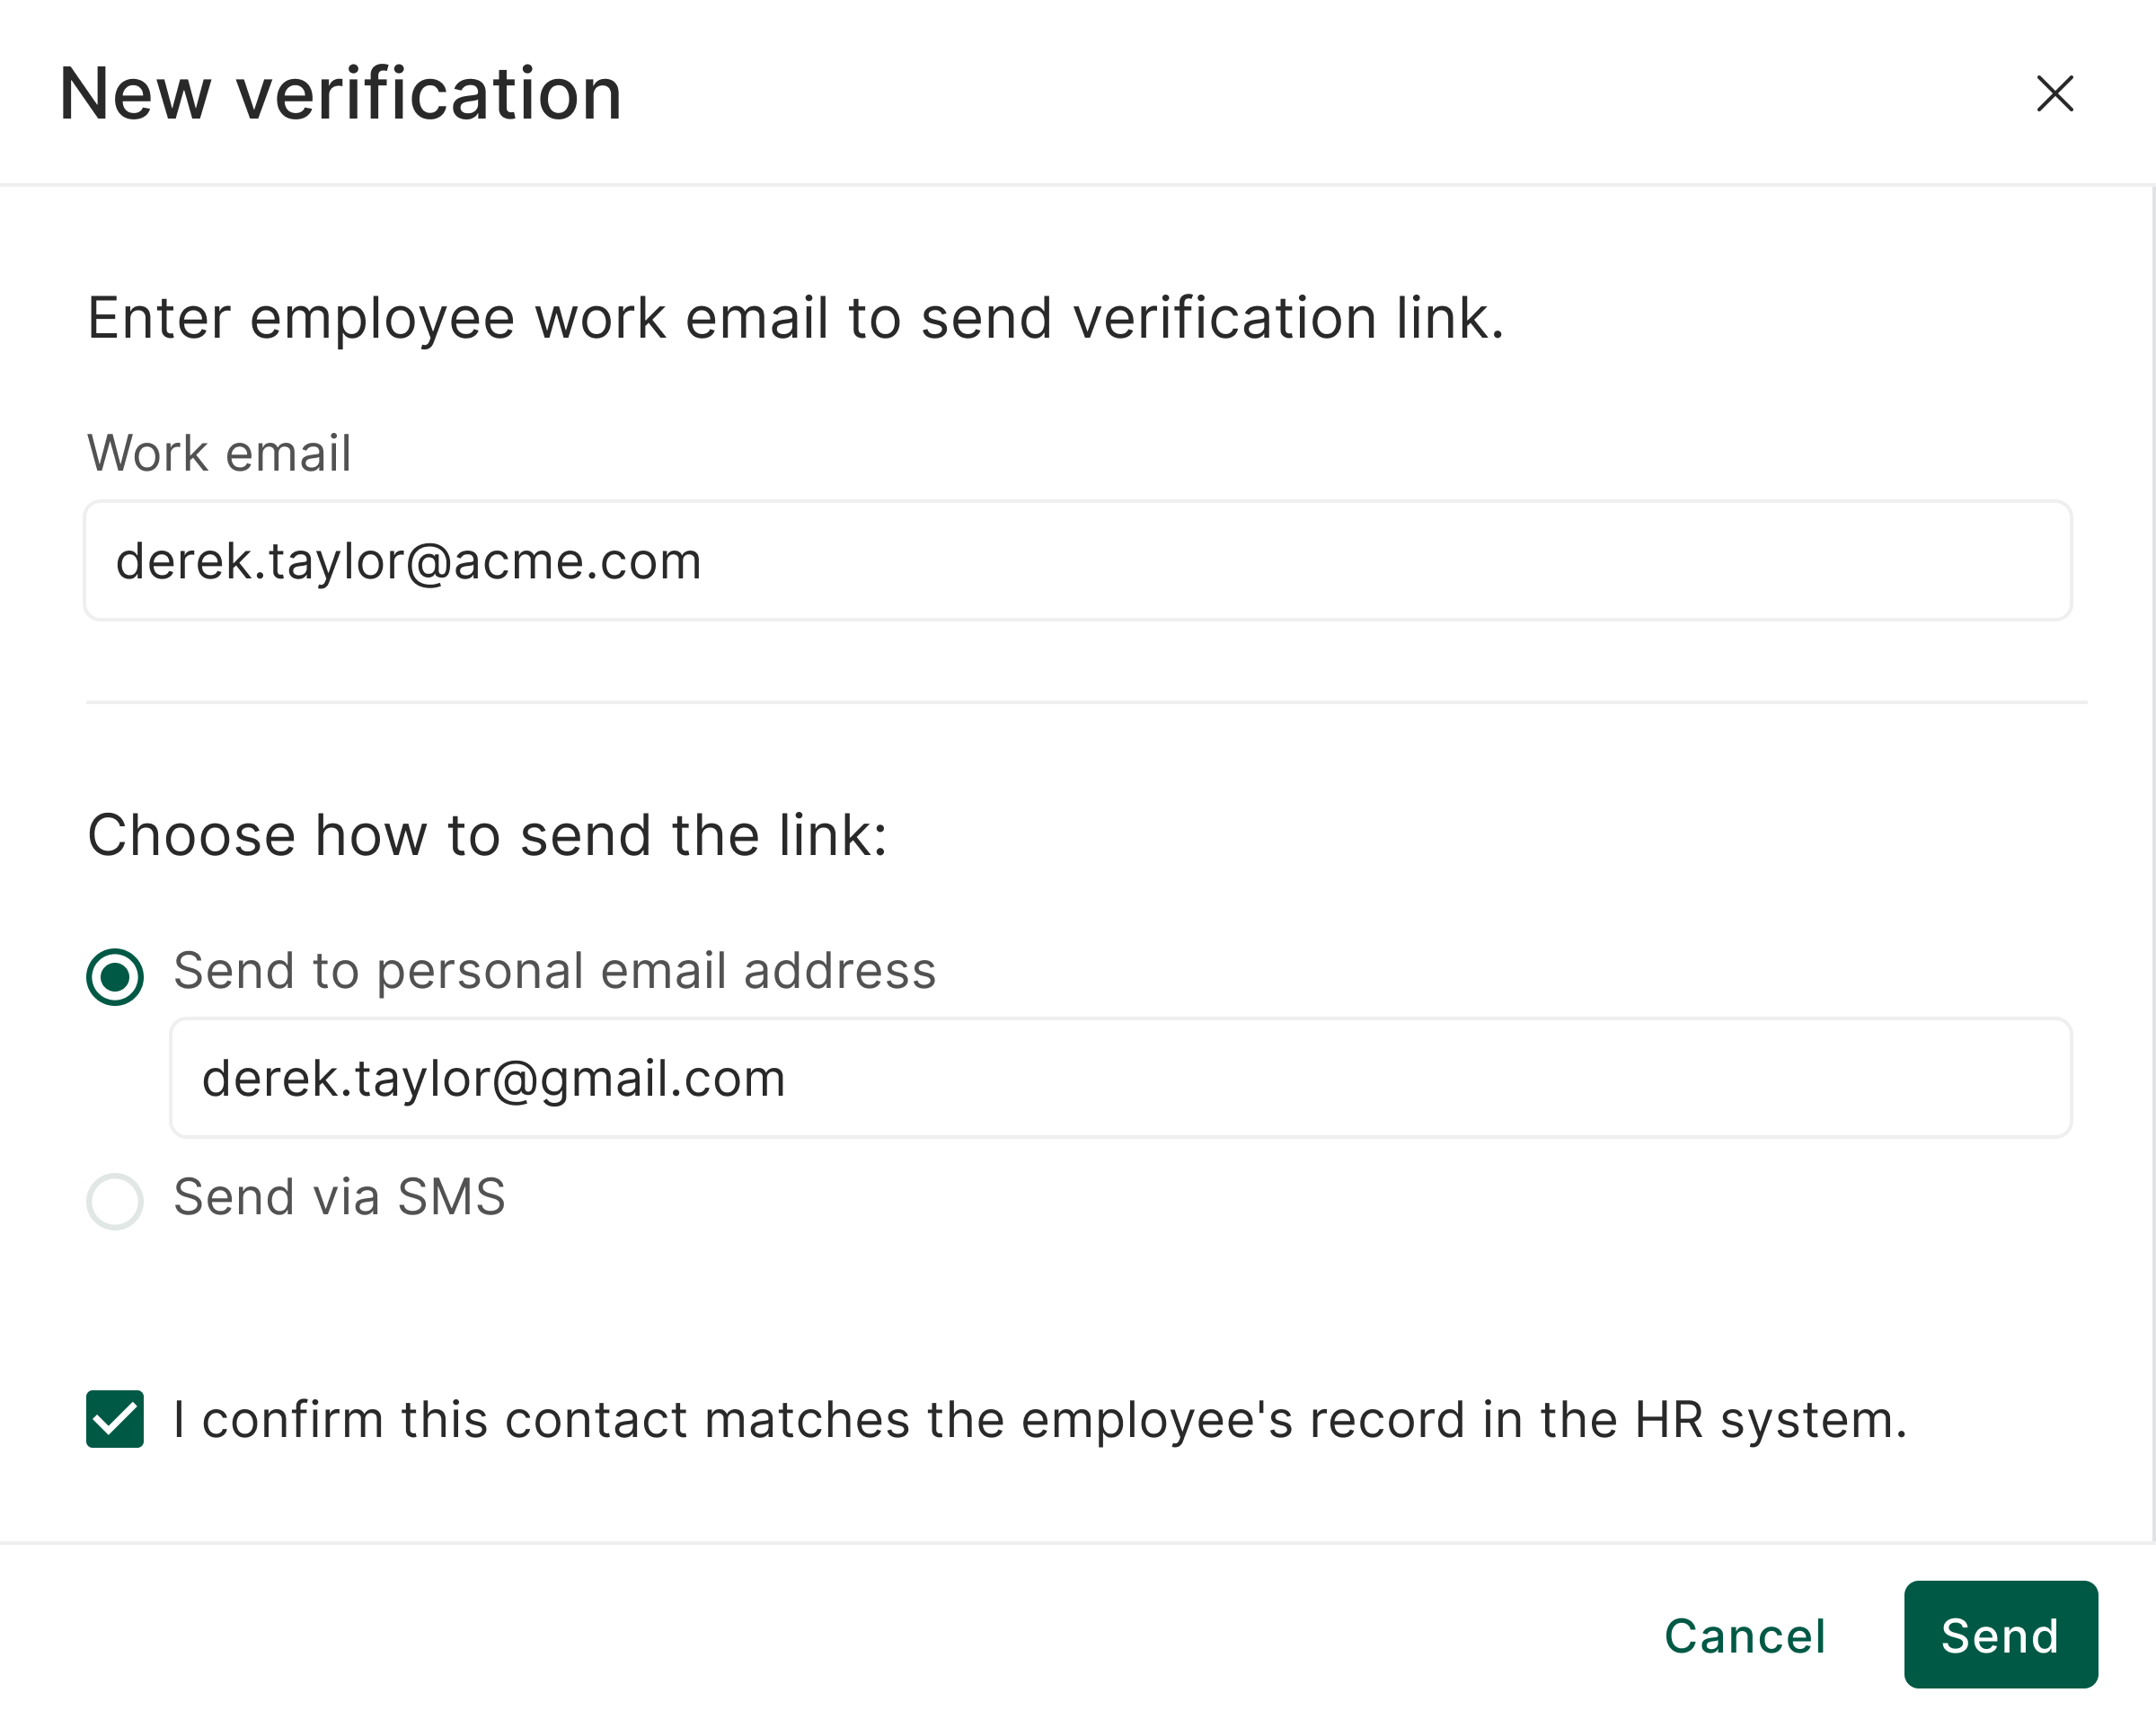
To send a Verification Portal Link, click Send Verification Portal Link (top-right of the Helpdesk Verifications page) and fill in:
Work email - the work email of the employee to verify.
How to send the link - deliver the secure link via SMS or to a personal email address.
Then press Send.
How the personal contact is set depends on what imper.ai has on file for the employee's work email:
A personal contact is on file - if imper.ai already has a personal email or phone number linked to the work email, it is autofilled automatically (and masked). If the autofilled contact isn't correct, choose Send to a different contact to enter a different one.
No personal contact is on file - the agent enters the personal email or phone number manually and must confirm, by checking the consent checkbox, that the contact belongs to the employee before the link can be sent.
The user then receives the secure link, which takes them to the imper.ai Self-Service Portal and begins verification immediately. All verification data is recorded and audited in the Helpdesk Verifications table.
For the end-to-end flow, see the Help Desk Protection Overview.
Exporting Verification Records
Click Export CSV to download the current table view. This allows teams to:
Review high-risk events
Conduct internal audits
Track helpdesk performance
Analyze verification trends
Accessing Verification Details
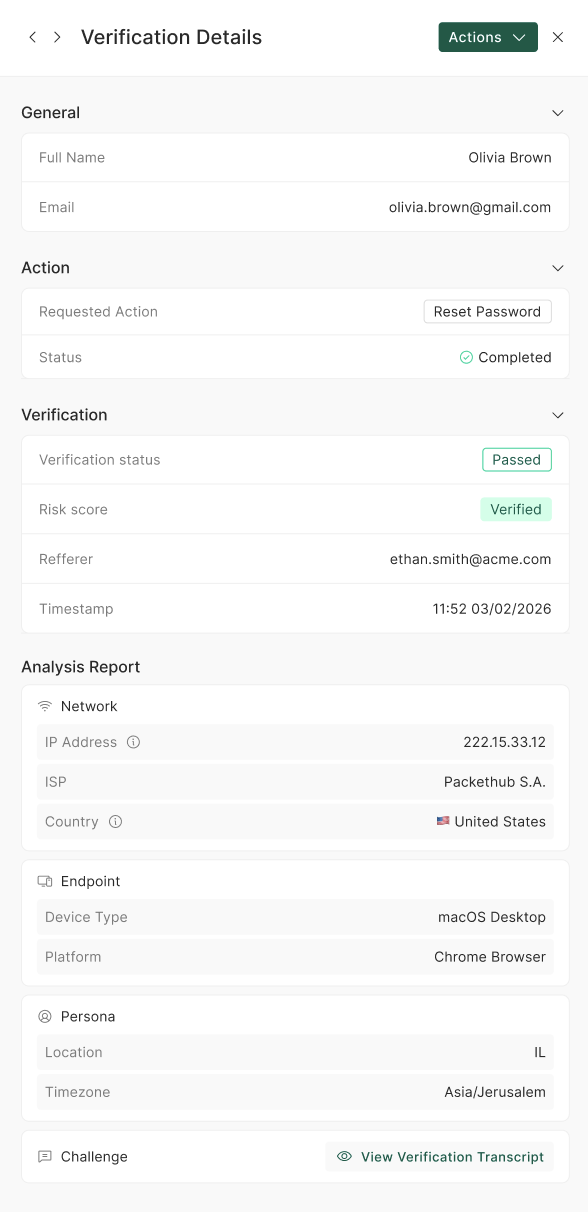
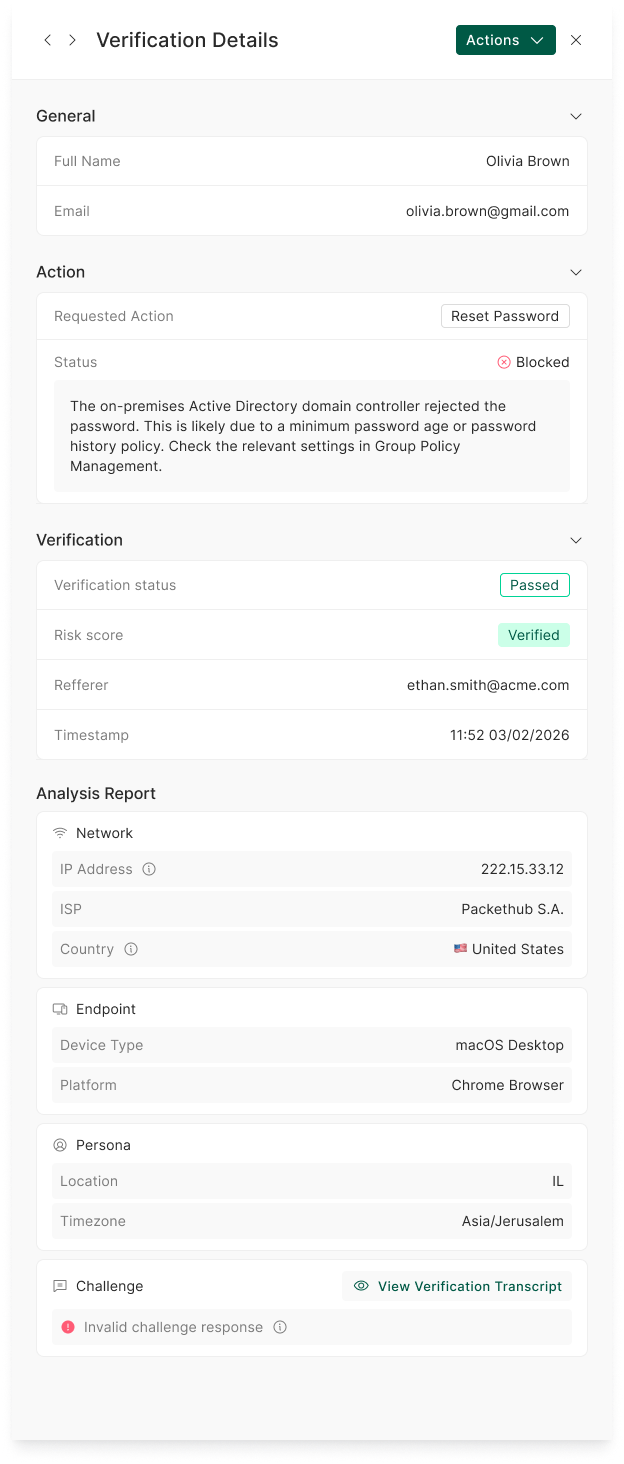
Selecting a verification record opens the Verification Summary panel, which includes:
General information - name, email, verification status, risk score, referrer, and the time of the verification
An Action section showing the action the user performed, its status, and what triggered it (see Action below)
An Analysis Report breaking down the signals imper.ai evaluated, grouped into Network, Endpoint, and Persona layers (see Analysis Report below)
Link to the full Verification Transcript - admins can review the complete chat transcript to see exactly where the employee answered incorrectly
Action
The Action section shows the action the user performed and its status; if the action failed, the reason is shown after the status. It also shows a Triggered By value indicating what initiated the action (hover over it to see its full description):
| Value | Meaning |
|---|---|
| Self-service | The user performed the action themselves via the Self-Service Portal (SSP). |
| Manual | An agent triggered the action manually. |
The drawer looks slightly different depending on the verification outcome and the action taken. The examples below show a passed verification with an action performed (left) and a passed verification with a failed action, where the Action section shows the reason for the failure (right).
Analysis Report
The Analysis Report explains why a verification received its risk score by grouping the evaluated signals into categories - including the Challenge (verification-questions) transcript. For a full breakdown, see Analysis Report.
When a verification comes back inconclusive, imper.ai can apply an extra layer of confirmation - a document check or manager approval - before a sensitive action is allowed. See Escalating Inconclusive Verifications for how these work.