
Appearance
Overview
Imper.ai enables secure Active Directory password reset and account unlock operations by connecting to your Domain Controllers over LDAPS using a Linux VM that runs the Twingate Connector, deployed within your network.
No software or agent is installed on your Domain Controllers.
All connectivity is initiated from Imper.ai through the encrypted Twingate network to a Linux VM you provision that runs the Twingate Connector, which then communicates with your Domain Controllers over LDAPS.
Traffic Flow
Imper.ai service → Twingate secure network → Domain Controller(s) over LDAPS → Active Directory
This design ensures:
No inbound access into your network
Communication limited to your Domain Controllers
Encrypted directory communication via LDAPS
Minimal infrastructure changes required
Prerequisites
Make sure the following are in place before you start the setup:
A connected identity provider - for example, Google Workspace or Entra - must already be connected.
A dedicated Linux virtual machine. Ubuntu 22.04 LTS or Red Hat Enterprise Linux 8+, with 2 vCPU, 2 GB RAM, and 20 GB disk, on a network that can reach your Domain Controllers.
Access to your Domain Controllers. Know the address of each Domain Controller you plan to manage (one per domain) and make sure it is reachable over LDAPS. For a multi-domain forest, have an address ready for each domain. See Choosing Your Domain Controllers.
An Active Directory service account with the delegated permissions described in Service Account and Required Permissions.
Firewall rules for the Linux VM, following the connectivity tables in Step 2.
Run the connectivity check on the VM once it exists - see Connectivity check.
A cloud password-sync mechanism (if your users sign in through a cloud identity provider with their AD password). Without it, a reset updates only the on-premises password and never reaches cloud sign-in. See Cloud Password Sync.
The CA certificate that issued your Domain Controllers' LDAPS certificates (optional). Provide it if you want to enable certificate verification. See Step 4.
Choosing Your Domain Controllers
Imper.ai requires one Domain Controller address for each domain you want to manage. Each Domain Controller must be:
Writable - password reset and unlock are write operations, so Read-Only Domain Controllers (RODCs) are not supported.
Reachable over LDAPS (TCP 636) from the Linux VM.
The primary Domain Controller should also be a Global Catalog server - Imper.ai uses the Global Catalog (TCP 3269) on it for forest-wide user lookups.
You can change Domain Controller addresses later from the integration menu (Configure Domain Controllers).
NOTE
Using Microsoft Entra with Password Hash Synchronization? The DC you pick affects how fast a reset reaches cloud sign-in - see Cloud Password Sync.
NOTE
Multi-domain forest? A few extra rules apply - see Multi-Domain Forests.
Service Account and Required Permissions
Create a dedicated Active Directory service account for Imper.ai. Do not reuse an existing administrative account.
Required permissions
Grant the delegations below at the domain root, on the CN=Users container, or on the top-level Organizational Units (OUs) that contain the managed users. Delegations at the domain root with inheritance enabled cover all users automatically.
| Capability | Required delegation |
|---|---|
| Look up and read user accounts | Read all properties on user objects |
| Reset passwords | Reset Password extended right and Write pwdLastSet on user objects |
| Unlock locked accounts | Write lockoutTime on user objects |
NOTE
Both permissions in the reset row are required: every password reset updates pwdLastSet together with the password.
Granting the permissions
Grant all the permissions on the Security tab.
IMPORTANT
In a multi-domain forest, you must grant these permissions in every domain you manage. A permission entry applies only to the domain where you set it and does not carry across domains, so repeat these steps once per domain.
In Active Directory Users and Computers, enable View -> Advanced Features.
Right-click the domain root or the OU that contains your managed users, select Properties, open the Security tab, and click Advanced.
Click Add, then Select a principal and choose the Imper.ai service account.
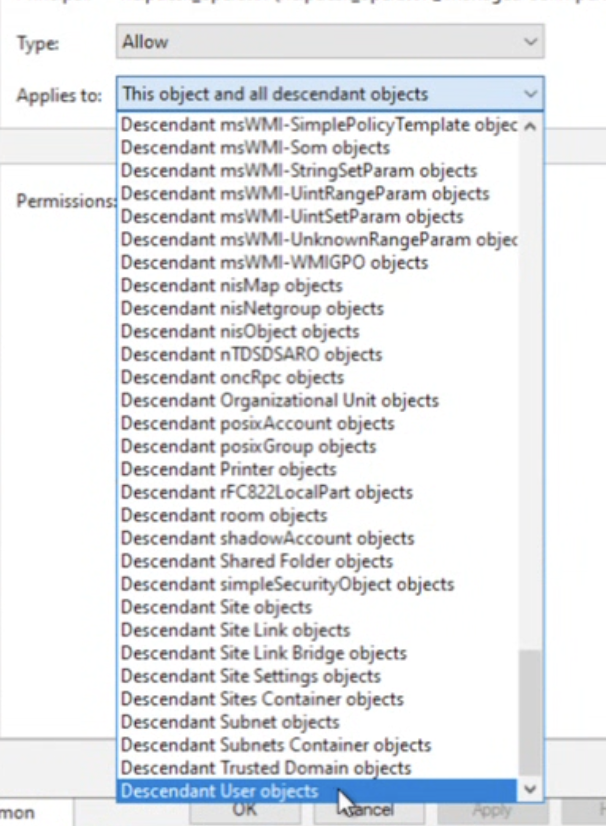
Set Applies to to Descendant User objects.
In the permission list, check each of the following:
- Read all properties
- Reset password
- Read pwdLastSet
- Write pwdLastSet
- Read lockoutTime
- Write lockoutTime
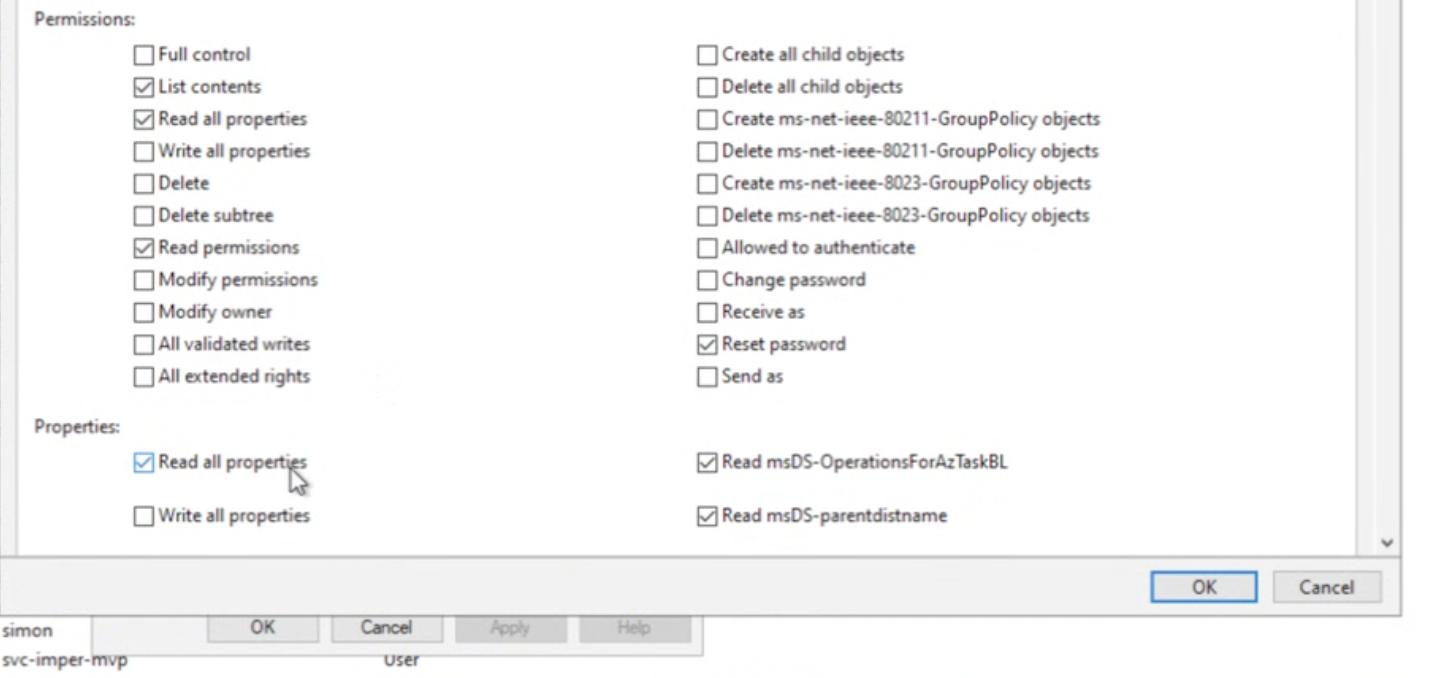
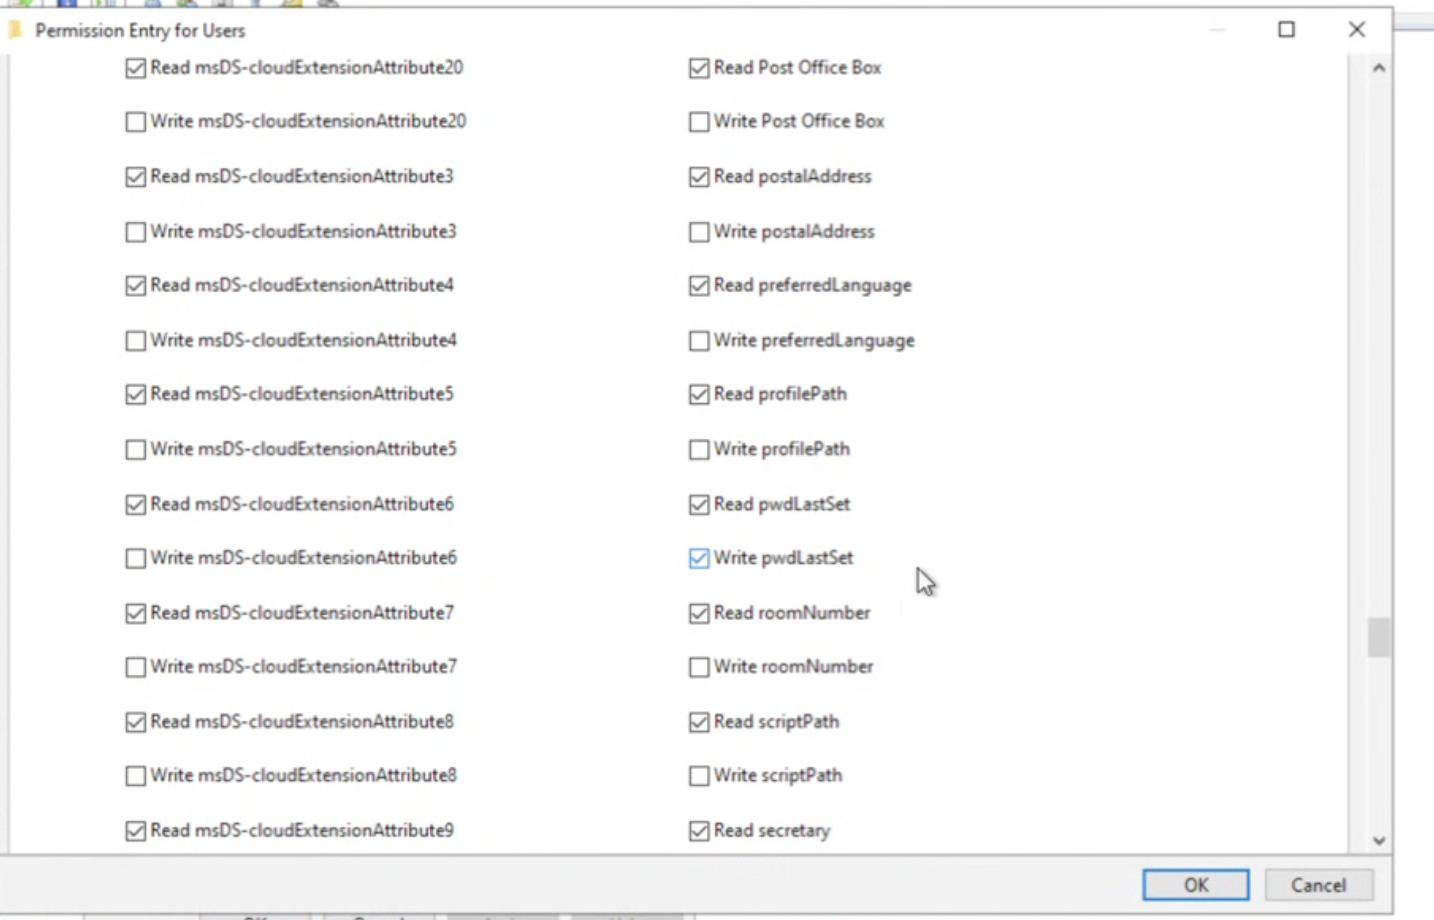
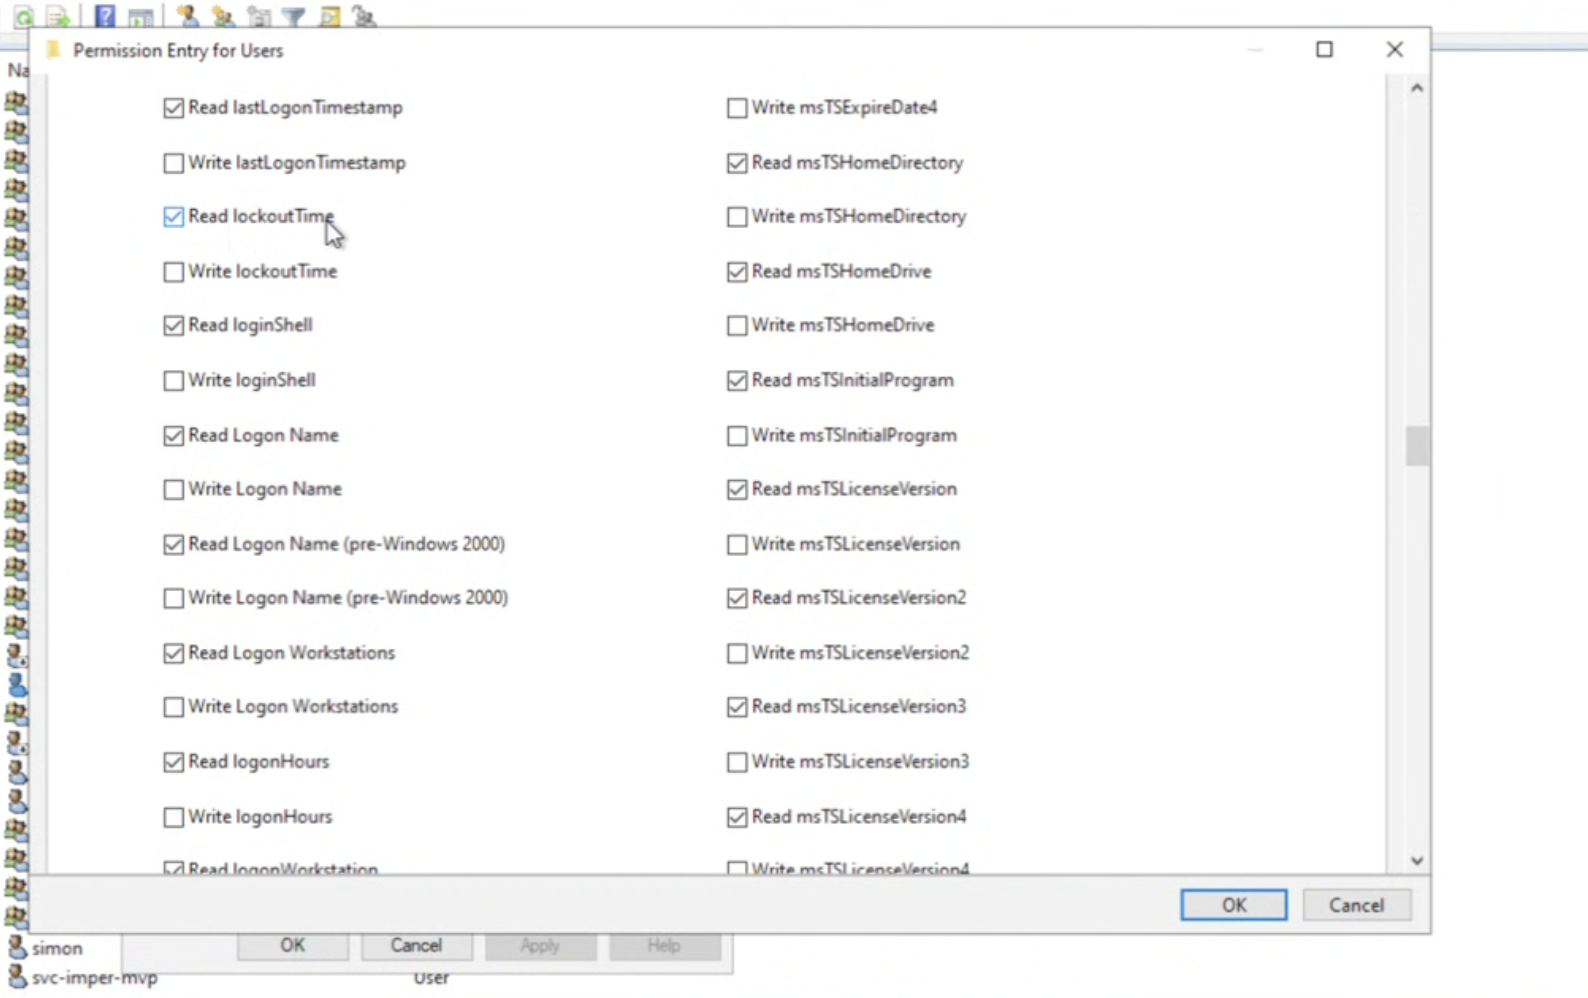
Click OK to apply.
NOTE
Protected accounts (members of AdminSDHolder-protected groups such as Domain Admins) do not inherit delegated permissions, so they cannot be managed through this integration.
After you connect, Imper.ai runs a permissions verification against every configured domain and reports exactly which grant is missing, if any.
NOTE
A newly granted permission can take a few minutes to appear in the permissions check while Active Directory replicates the change - for example, a permission granted in a child domain. If the Permissions step reports a grant as missing right after you set it, wait for replication and run the check again.
Deployment Steps
Step 1 - Integrate with imper
Login to imper.ai admin console
Navigate to the Integrations page
click connect on the Active Directory integration
Choose Install AD Connector
.png)
Step 2 - Provision a Dedicated Linux VM
Deploy a Linux virtual machine to run the Twingate Connector.
Recommended VM configuration
| Parameter | Value |
|---|---|
| Operating System | Ubuntu 22.04 LTS or Red Hat Enterprise Linux 8+ |
| CPU | 2 vCPU |
| Memory | 2 GB RAM |
| Disk | 20 GB |
Allow Required Network Connectivity to Domain Controllers
Ensure the Linux VM can reach your Domain Controllers:
| source | destination | port | purpose |
|---|---|---|---|
| Linux VM | Domain Controllers | TCP 636 | LDAPS - directory reads and writes |
| Linux VM | Primary Domain Controller | TCP 3269 | Global Catalog over SSL - forest-wide user lookup |
Make sure the virtual machine (VM) is on a network that can communicate with your Active Directory Domain Controllers.
Allow Required Outbound Internet Connectivity
The Linux VM must reach Twingate's infrastructure so the connector can be installed, enrolled, and stay connected. Verify your firewall permits the following outbound access before continuing:
| destination | port | purpose |
|---|---|---|
*.twingate.com | TCP 443 | Twingate controller - enrollment and control channel |
pubsub.pubnub.com, ps.pndsn.com, h2.pubnubapi.com | TCP 443 | Real-time signaling |
Twingate Relay - Google Cloud external IP ranges and 167.254.176.0/21 | TCP 30000-31000 | Twingate Relay - carries the encrypted tunnel traffic |
binaries.twingate.com, packages.twingate.com | TCP 443 | Installer script and connector packages (install and upgrade time) |
NOTE
The PubNub hostnames are part of Twingate's official allowlist and are not covered by a *.twingate.com rule - add them explicitly.
IMPORTANT
The relay IP block 167.254.176.0/21 is required by Twingate starting July 10, 2026. Make sure it is in your allowlist.
Outbound UDP is not required - connections to Imper.ai are carried over Twingate's TCP relay.
Linux VM connectivity check
Run this check on the Linux VM ahead of time to confirm everything is in place - it catches anything that would otherwise cause a later step to fail. It validates every network requirement listed above and, for anything that's blocked, prints a hint on how to fix it.
Copy the entire block below and paste it into a shell on the VM: it saves the script to /tmp/connector-machine-connectivity-check.sh and runs it immediately. The script is written inline rather than downloaded, so you can review every line before running it - it fetches the Twingate installer only to test for TLS interception and never executes it.
To also test LDAPS reachability, append your Domain Controller addresses to the end of the final line. The first address is treated as the primary Domain Controller and is additionally checked for Global Catalog access. If you don't provide any addresses, the Domain Controller checks are skipped.
Show the connectivity check script
bash
cat > /tmp/connector-machine-connectivity-check.sh <<'IMPER_EOF'
#!/bin/bash
# Connector machine connectivity check.
# Run on the Linux machine that will host the Twingate Connector:
#   bash connector-machine-connectivity-check.sh PRIMARY_DC_IP [DC_IP ...]
# Domain controller addresses are optional. Without them the domain
# controller checks are skipped.

set -u

TWINGATE_HOSTS="binaries.twingate.com packages.twingate.com imperai.twingate.com"
PUBNUB_HOSTS="h2.pubnubapi.com pubsub.pubnub.com ps.pndsn.com"
SETUP_SCRIPT_URL="https://binaries.twingate.com/connector/setup.sh"
CONNECT_TIMEOUT=5

pass_count=0
fail_count=0
warn_count=0

if [ -t 1 ] && command -v tput >/dev/null 2>&1 && [ "$(tput colors 2>/dev/null || echo 0)" -ge 8 ]; then
    green=$(tput setaf 2)
    red=$(tput setaf 1)
    yellow=$(tput setaf 3)
    reset=$(tput sgr0)
else
    green=""
    red=""
    yellow=""
    reset=""
fi

report_pass() {
    pass_count=$((pass_count + 1))
    printf '%s[PASS]%s %s\n' "$green" "$reset" "$1"
}

report_fail() {
    fail_count=$((fail_count + 1))
    printf '%s[FAIL]%s %s\n' "$red" "$reset" "$1"
    echo "       Fix ($2): $3"
}

report_warn() {
    warn_count=$((warn_count + 1))
    printf '%s[WARN]%s %s\n' "$yellow" "$reset" "$1"
    if [ -n "$2" ]; then
        echo "       Note: $2"
    fi
}

report_skip() {
    echo "[SKIP] $1"
}

report_info() {
    echo "[INFO] $1"
}

tcp_check() {
    timeout "$CONNECT_TIMEOUT" bash -c "echo > /dev/tcp/$1/$2" 2>/dev/null
}

echo "Connector machine connectivity check"
echo "Machine: $(uname -n) at $(date -u '+%Y-%m-%d %H:%M UTC')"
echo

# Check 1: Machine Basics.
required_tools_ok=1
for tool in curl getent timeout; do
    if command -v "$tool" >/dev/null 2>&1; then
        report_pass "required tool present: $tool"
    else
        required_tools_ok=0
        report_fail "required tool missing: $tool" "your server team" "install $tool (preinstalled on standard Ubuntu Server and RHEL)"
    fi
done

if [ -d /run/systemd/system ]; then
    report_pass "systemd is running"
else
    report_fail "systemd is not running" "your server team" "use a systemd based OS: Ubuntu 22.04 LTS or RHEL 8+"
fi

package_manager=""
if command -v apt-get >/dev/null 2>&1; then
    report_pass "package manager found: apt-get (Ubuntu or Debian)"
    package_manager="apt"
elif command -v dnf >/dev/null 2>&1; then
    report_pass "package manager found: dnf (RHEL family)"
    package_manager="dnf"
else
    report_fail "no supported package manager found" "your server team" "supported OS: Ubuntu 22.04 LTS or RHEL 8+ with apt-get or dnf"
fi

can_elevate=0
run_as_root=0
if [ "$(id -u)" = "0" ]; then
    report_pass "running as root"
    can_elevate=1
    run_as_root=1
elif command -v sudo >/dev/null 2>&1 && sudo -n true 2>/dev/null; then
    report_pass "sudo works without a prompt"
    can_elevate=1
else
    report_warn "sudo not verified, it may prompt for a password" "the installation command needs root. Run sudo -v first"
fi

# Check 2: Proxy Detection.
proxy_found=$(printenv http_proxy https_proxy HTTP_PROXY HTTPS_PROXY 2>/dev/null | head -1)
if [ -z "$proxy_found" ] && grep -qi 'proxy' /etc/environment 2>/dev/null; then
    proxy_found="proxy entry in /etc/environment"
fi
if [ -n "$proxy_found" ]; then
    report_warn "proxy detected: $proxy_found" "the Twingate connector does not support forward proxies. This machine needs DIRECT outbound access to the Twingate domains and relay ranges. Ask your network team for a proxy bypass. curl honors the proxy but the raw TCP tests below do not, so mixed results are expected"
fi

# Checks 3 and 4: DNS Resolution and TCP 443 per Required Host.
if [ "$required_tools_ok" = "0" ]; then
    report_skip "network checks (required tools are missing, fix those first)"
    echo
    echo "Summary: $pass_count passed, $fail_count failed, $warn_count warnings"
    exit "$fail_count"
fi
for host in $TWINGATE_HOSTS $PUBNUB_HOSTS; do
    if getent hosts "$host" >/dev/null 2>&1; then
        report_pass "DNS resolves: $host"
    else
        report_fail "DNS cannot resolve: $host" "your DNS or network team" "this machine must resolve public DNS names"
        continue
    fi
    if tcp_check "$host" 443; then
        report_pass "TCP 443 reachable: $host"
    else
        report_fail "TCP 443 blocked: $host" "your firewall team" "allow outbound TCP 443 to $host"
    fi
done

# Check 5: Interception Detection on the Installer Download.
setup_body=$(curl -fsS --max-time 15 "$SETUP_SCRIPT_URL" 2>/dev/null)
curl_status=$?
case "$setup_body" in
    '#!'*)
        setup_is_script=1
        ;;
    *)
        setup_is_script=0
        ;;
esac
if [ "$curl_status" -eq 60 ]; then
    report_warn "TLS certificate error while fetching the installer" "a TLS inspecting firewall or proxy is likely intercepting. Ask your security team to bypass inspection for the twingate.com domains"
elif [ "$curl_status" -ne 0 ]; then
    report_fail "cannot download the installer script (curl exit $curl_status)" "your firewall team" "allow outbound HTTPS to binaries.twingate.com"
elif [ "$setup_is_script" = "1" ]; then
    report_pass "installer script downloads intact"
else
    report_fail "installer download is INTERCEPTED, the response is not a shell script (likely a block page)" "your firewall team" "the firewall replaces the response body. Allow binaries.twingate.com without content filtering"
fi

# Check 6: OS Package Repositories.
if [ "$can_elevate" = "1" ] && [ "$package_manager" = "apt" ]; then
    apt_reachable=1
    if [ "$run_as_root" = "1" ]; then
        timeout 60 apt-get update -qq >/dev/null 2>&1 || apt_reachable=0
    else
        timeout 60 sudo -n apt-get update -qq >/dev/null 2>&1 || apt_reachable=0
    fi
    if [ "$apt_reachable" = "1" ]; then
        report_pass "OS package repositories reachable (apt)"
    else
        report_warn "apt repositories not fully reachable" "the installer needs OS packages. Check your apt mirror access"
    fi
elif [ "$can_elevate" = "1" ] && [ "$package_manager" = "dnf" ]; then
    dnf_reachable=1
    if [ "$run_as_root" = "1" ]; then
        timeout 90 dnf -q makecache >/dev/null 2>&1 || dnf_reachable=0
    else
        timeout 90 sudo -n dnf -q makecache >/dev/null 2>&1 || dnf_reachable=0
    fi
    if [ "$dnf_reachable" = "1" ]; then
        report_pass "OS package repositories reachable (dnf)"
    else
        report_warn "dnf repositories not fully reachable" "the installer needs dnf-plugins-core from BaseOS and AppStream. Check subscription or mirror access"
    fi
else
    report_skip "OS repository check (needs root or passwordless sudo)"
fi

# Check 7: Domain Controllers.
if [ "$#" -eq 0 ]; then
    report_skip "domain controller checks (re-run with addresses: bash $0 PRIMARY_DC_IP DC_IP ...)"
else
    primary_checked=0
    for dc_address in "$@"; do
        if tcp_check "$dc_address" 636; then
            report_pass "LDAPS (TCP 636) reachable: domain controller $dc_address"
        else
            report_fail "LDAPS (TCP 636) blocked: domain controller $dc_address" "your network team" "allow TCP 636 from this machine to $dc_address"
        fi
        if [ "$primary_checked" = "0" ]; then
            primary_checked=1
            if tcp_check "$dc_address" 3269; then
                report_pass "Global Catalog (TCP 3269) reachable: primary domain controller $dc_address"
            else
                report_warn "Global Catalog (TCP 3269) not reachable on primary domain controller $dc_address" "recommended for multi domain forests. Allow TCP 3269 to the primary domain controller"
            fi
        fi
    done
fi

# Check 8: Relay Ranges.
report_info "relay ranges cannot be tested from here. Ensure outbound TCP 30000-31000 is allowed to Google Cloud external IP ranges plus 167.254.176.0/21, see the integration guide"

echo
echo "Summary: $pass_count passed, $fail_count failed, $warn_count warnings"
exit "$fail_count"
IMPER_EOF
bash /tmp/connector-machine-connectivity-check.sh
Step 3 - Install & Authenticate Twingate
Click Copy and run the command on the Linux VM.
The command will download, install and then activate Twingate Connector with the credentials we provide. Packages are installed from Twingate's official repository (packages.twingate.com).
.png)
Important security note about the credentials
The setup command embeds a secret Twingate OAuth key that enrolls this VM into your tenant's Twingate network. Treat it like private key material - do not:
Commit it to source control
Upload it to shared documentation systems
Send it through unsecured channels
Reuse it outside the specific Linux VM it was issued for
The key is used only to enroll this VM.
Local validation after the installation completes
After the script finishes, validate from the Linux VM that local LDAPS connectivity to your Domain Controller works, for example:
timeout 3 bash -c '</dev/tcp/YOUR_DC_ADDRESS/636' && echo "LDAPS reachable"
timeout 3 bash -c '</dev/tcp/YOUR_PRIMARY_DC_ADDRESS/3269' && echo "Global Catalog reachable"
NOTE
This check only verifies local connectivity from the router VM to your DC. imper.ai will validate the Twingate path from our side after the route is approved.
Step 4 - Enter Credentials and Connect
Make sure the service account from Service Account and Required Permissions already exists, then continue through the remaining steps of the setup dialog in the imper.ai console.
Credentials. Enter:
Primary Domain Controller IP - see Choosing Your Domain Controllers
Service Account Username - UPN preferred, for example
svc-imper-ad-reset@contoso.comService Account Password
CA certificate (optional) - upload the certificate that issued your Domain Controller's LDAPS certificate to enable certificate verification. If omitted, verification is disabled. To export the certificate, see Exporting the CA Certificate below.
Configure Domains. imper.ai lists the domains discovered in your forest. Confirm or enter one Domain Controller address for each domain you want to manage, then press Connect.
Permissions. imper.ai checks the service account across every configured domain and shows, per domain, whether Reset passwords and Unlock accounts are granted. If anything is missing, grant it in Active Directory, run the check again, then press Done. You can re-run this check later from the integration menu.
Exporting the CA Certificate
Optional, and only needed if you want to upload a CA certificate in the Credentials step to enable TLS certificate verification. Export the certificate of the CA that issued your Domain Controller's LDAPS certificate. The uploaded file must be Base-64 (PEM) encoded.
Option 1 - GUI
Run certlm.msc and locate the issuing CA certificate (for example contoso-ad-EC2AMAZ-LSQPDGV-CA):
On a Domain Controller (which is also your issuing CA): under
Personal -> Certificates.On a domain-joined Windows machine that is not the Domain Controller: under
Trusted Root Certification Authorities -> Certificatesfor a root CA, orIntermediate Certification Authorities -> Certificatesfor a subordinate CA.
Then:
Right-click the certificate
Select
All Tasks -> ExportIn the wizard, select
No, do not export the private keySelect
Base-64 encoded X.509 (.CER)
Upload the exported .CER file in the Credentials step.
Option 2 - PowerShell export by thumbprint
If you know the CA certificate thumbprint:
Export-Certificate -Cert (Get-Item "Cert:\LocalMachine\CA\CA_THUMBPRINT_HERE") -FilePath C:\ca-der.cer
certutil -encode C:\ca-der.cer C:\ldaps-issuing-ca.cer
Cert:\LocalMachine\CA is the Intermediate store - use Cert:\LocalMachine\Root for a root CA. Then upload C:\ldaps-issuing-ca.cer in the Credentials step.
Multi-Domain Forests
If your Active Directory is a multi-domain forest:
After the connector activates, Imper.ai discovers every domain in the forest and lists them in the Configure Domains step.
Provide one Domain Controller address per domain whose users you want to manage. Domains without a configured DC are not managed. A second DC that resolves to an already-configured domain is ignored.
The domain where the service account lives must have a configured DC, otherwise the setup verification cannot complete.
User lookups run forest-wide through the Global Catalog on the primary DC. Each reset or unlock is then performed against the user's home-domain DC over LDAPS.
Cloud Password Sync
The AD Connector changes the password in on-premises Active Directory. If your users sign in through a cloud identity provider with that password, your tenant needs a way to carry the change to the cloud:
Microsoft Entra ID / Microsoft 365 - Password Hash Synchronization, Pass-Through Authentication, or federation.
Google Workspace - a password-sync solution such as Google Password Sync. Google Cloud Directory Sync syncs users and groups, not passwords.
Without one of these, a reset changes only the on-premises password and cloud sign-in is unaffected. Account unlock is always an on-premises operation and never depends on cloud sync.
Sign-in Delay with Password Hash Synchronization
Applies only to Password Hash Synchronization. Pass-Through Authentication and federation validate on-premises, so a reset takes effect immediately.
Password Hash Synchronization reads changes from one Domain Controller and pushes them to Entra every few minutes (about 2 minutes for Entra Connect, 2–5 for Cloud Sync). A reset reaches the cloud only once it is on the DC the sync agent reads.
Point Imper.ai at a Domain Controller in the same Active Directory site as your sync agent, ideally the same DC. Replication within a site is near-immediate. Your AD team can tell you which DC the sync agent uses.
If the DC is in a different site, the reset must replicate across sites first. Inter-site replication is scheduled by default (Microsoft default 3 hours, 15-minute minimum), so cloud sign-in can lag a reset by 15 minutes to a few hours. Your AD team can enable replication change notification (the USE_NOTIFY option on the site link) to make inter-site replication near-immediate.
NOTE
This delay affects cloud sign-in only. On-premises sign-in works right away - a reset replicates immediately to the PDC emulator, and a DC checks the PDC before rejecting a sign-in.
What Imper.ai Will Configure Next
After receiving the required information, Imper.ai will:
Add a resource for each of your Domain Controllers in your tenant's Twingate network
Grant access to those resources only to your tenant's dedicated connector - no other tenant or system can reach them
Configure the Imper.ai connector to:
Connect using LDAPS (TCP 636) and the Global Catalog (TCP 3269)
Verify the Domain Controller certificate chain against your CA certificate (if provided)
Authenticate using the provided service account
Perform password resets or account unlock using LDAP operations
Run a permissions verification against every configured domain and surface any missing delegation
Twingate Auth Key and VM Rebuilds
The Twingate authentication key is saved and used by the router VM to authenticate with the Twingate network.
No further action is required unless one of the following occurs:
The Linux VM is rebuilt or replaced
Twingate is uninstalled
The node is removed from the Twingate network
If any of these events occur, contact Imper.ai to obtain a new authentication key, and reintegrate.
Troubleshooting
Reset Twingate Connection State (Clean Re-enrollment)
If the Twingate connector on the router VM is in a bad state (for example, the node does not re-register, or you need to fully start over), reset the local state and re-run the setup script.
- Uninstall the Twingate service.
On Ubuntu:


sudo apt purge twingate-connector

On Red Hat Enterprise Linux:


sudo dnf remove twingate-connector
- Re-run the setup command provided by imper.ai.
The node will register as a new connector device.
After re-enrollment, proceed normally through the imper.ai admin portal.
Common Issues
No CA certificate provided
TLS certificate chain verification is skipped.
The connection still works but with reduced security guarantees.
Missing AD permissions
Password reset or account unlock operations fail because the service account lacks the required delegated rights.
The permissions verification in the imper.ai console shows which delegation is missing and in which domain - re-run it after fixing the delegation.
"Service account domain not yet configured"
- The service account lives in a child domain that has no Domain Controller configured. Add a DC address for that domain in Configure Domain Controllers.
Unlock fails for a disabled account
- Accounts that are administratively disabled cannot be unlocked through the integration - unlocking only clears the lockout state, it does not enable a disabled account.
User not found
- Users are matched by their identity provider email against the on-premises userPrincipalName (UPN). If a user's email does not match their UPN, the lookup fails - align the UPN or contact Imper.ai support.
Protected admin accounts
- Members of protected groups (Domain Admins, etc.) do not inherit delegated permissions (AdminSDHolder) and cannot be managed through this integration.
Firewall or egress rules block the connector
- The Linux VM cannot enroll or stay online if its outbound access to Twingate is blocked. Confirm the egress allowlist from Step 2.
Password reset succeeds on-premises but cloud sign-in still fails
- With Password Hash Synchronization or Google Password Sync, a reset updates the on-premises password immediately but reaches cloud sign-in only after the change synchronizes. If the Domain Controller Imper.ai writes to is in a different Active Directory site from the one that feeds sync, this can lag from 15 minutes to a few hours. See Cloud Password Sync.