
Appearance
Overview
Before you connect Workday for Hiring, set up the imper.ai interview account - a mailbox provisioned for your tenant that is added as an interviewer on every external interview. This is what makes a Workday-scheduled interview visible to imper.ai so the candidate gets a verification link.
The setup consists of 3 steps:
Request the imper.ai interview account
Create the interview account as a contingent worker in Workday
Configure the Workday validation rule
IMPORTANT
Complete these steps before Integrating Workday with imper.ai for Hiring.
Step 1: Request the imper.ai Interview Account
Contact your imper.ai representative to have the interview account provisioned. imper.ai creates a dedicated mailbox for your tenant - for example acme@imper.ai - and completes the setup on the imper.ai side.
You will receive back the account's email address (<tenant>@imper.ai). You will use it in Steps 2 and 3.
This is a single account per tenant, reused for every interview. It is not a per-recruiter or per-requisition account.
Step 2: Create the Interview Account as a Contingent Worker
The account has to exist as a worker in Workday before it can be selected in the Interviewers field.
Make sure a position is available
The task requires an unfilled Position, and the position list is often empty. Check first, and if there is nothing to pick, create one:
In the Workday search bar, type "Create Position" and select the task.
Choose the Supervisory Organization the account will sit under and click OK.
Fill in Job Posting Title (for example
imper ai Interview Account), Availability Date, and Earliest Hire Date. Leave Number of Positions at 1.Click Submit.
TIP
Ticking No Job Restrictions keeps the position unconstrained, which means you set Job Profile, Time Type, and Location by hand in the next task rather than having them inherited.
Create the worker
In the Workday search bar, type "Contract Contingent Worker" and select the task.
Choose the Supervisory Organization, select Create a New Pre-Hire, and click OK.
On the Legal Name Information tab, enter the name so it displays as imper ai - first name
imper, last nameai. The validation rule in Step 3 refers to the account by this name.On the Contact Information tab, click Add under Email, enter the
<tenant>@imper.aiaddress, and set Type to Work. Primary Work is ticked for you.Click OK to advance to the contract details, then complete:
Contract Start Date
Position - the position from above
Contingent Worker Type - open For Current Country and choose Contractor
Job Profile, Time Type, and Location
Reason - New Contingent Worker > Vacant Position if the position already existed, or > New Position if you just created it
- Click Submit. Workday confirms with You have submitted.
NOTE
Reason carries no red required marker, but Workday raises a blocking "Select a Reason" alert until it is set. Fill it before submitting.
Confirm the account is now selectable in the Interviewers field when scheduling an interview.
Step 3: Configure the Workday Validation Rule
Nothing reaches imper.ai unless the interview account is actually on the interview invite. Rather than relying on recruiters to remember, enforce it in Workday with a Critical validation on the Interview business process:
- External video Interviews must include "imper ai" as an Interviewer - blocks the recruiter from submitting an external video interview that omits the account
Building it takes three parts: two calculated fields, then the condition rule, then attaching the rule to the Schedule Interview step.
Before you start
You need a Workday administrator who can create calculated fields and condition rules. Condition-rule access comes from these domains in the System functional area:
Business Process Administration
Manage: Business Process Definitions
3a. Create two calculated fields
The rule needs to know whether an interview is a video interview. That value lives on the interview session rather than the interview itself, and an interview can have several sessions, so it takes two calculated fields to reach it: one to isolate a single session, and one to read the interview type from it.
Create both with the Create Calculated Field task, in this order - the second cannot find the first if it does not exist yet.
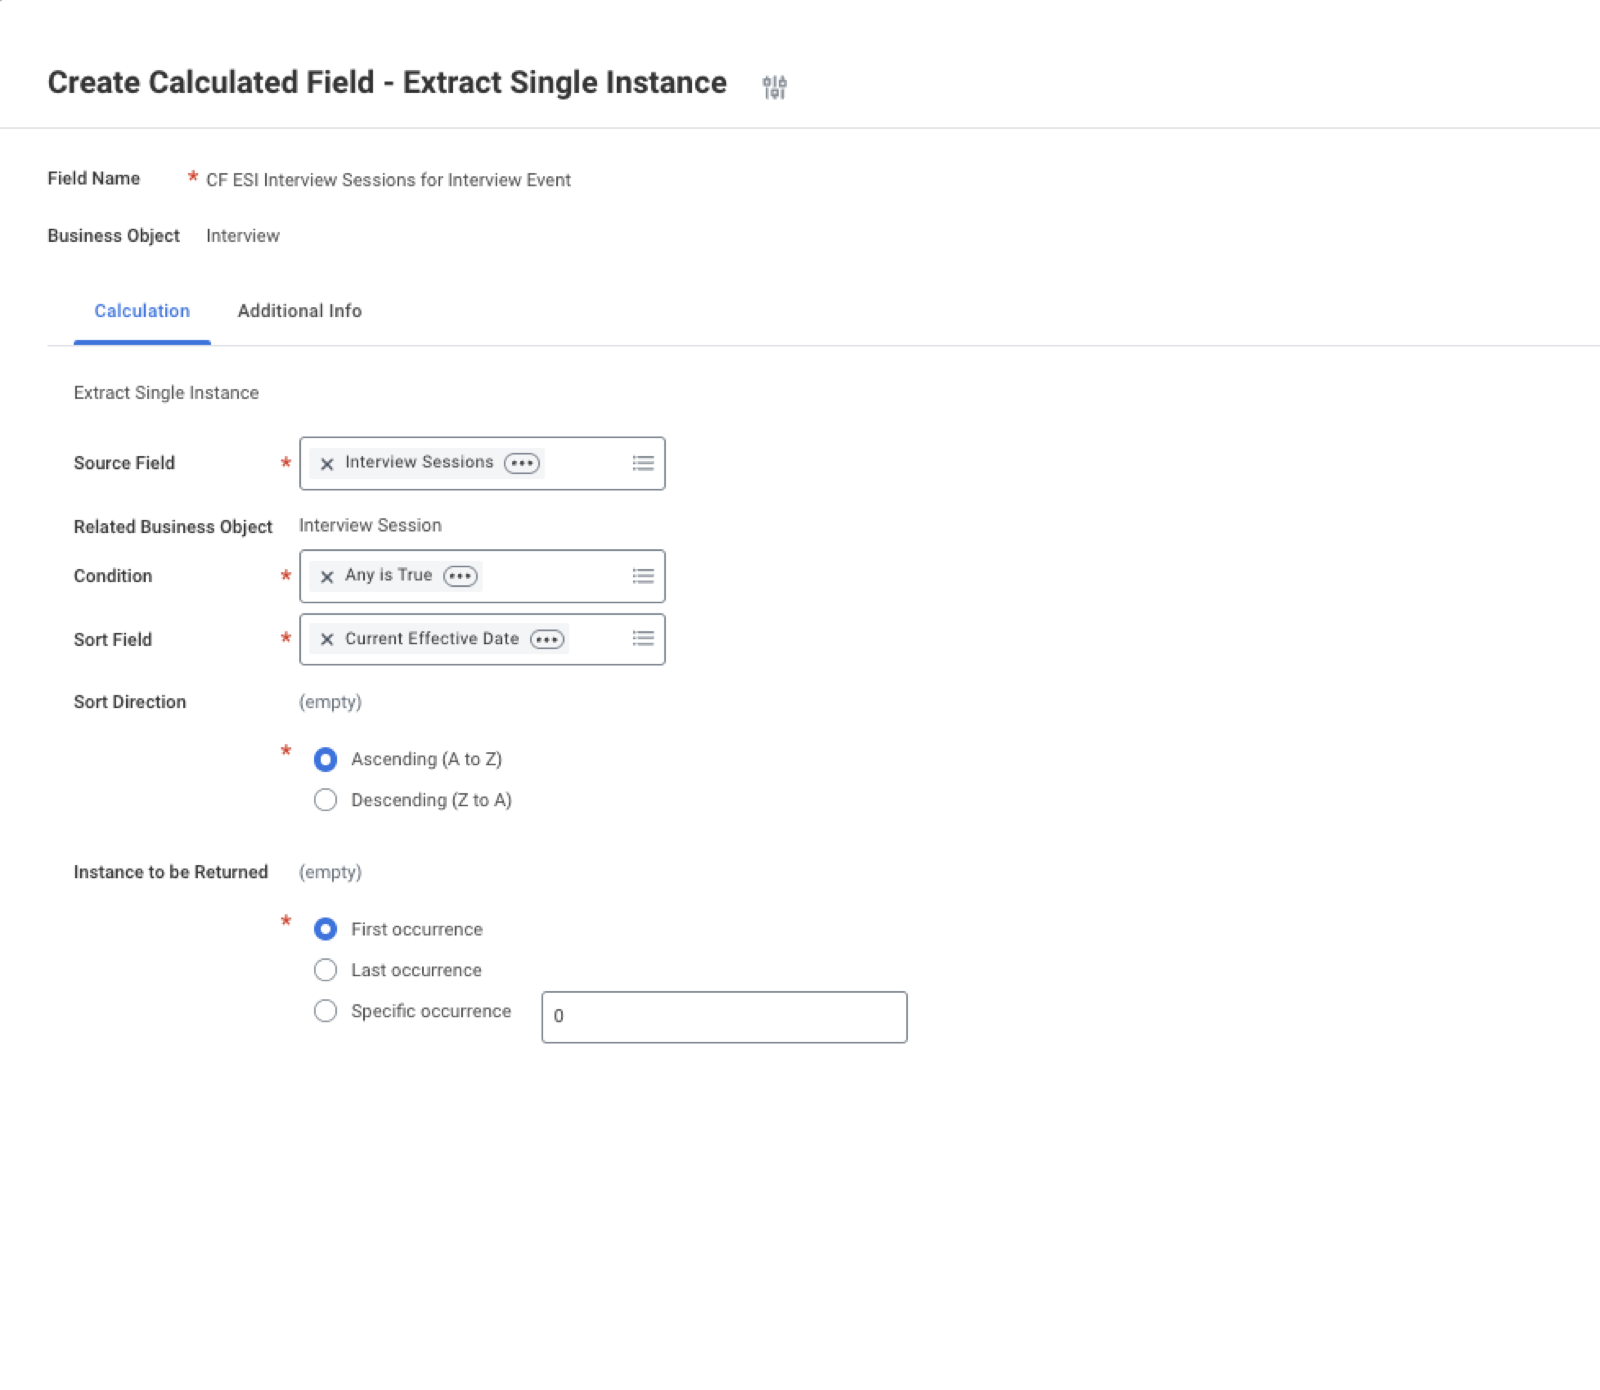
Field 1 - isolate one interview session
| Field | Value |
|---|---|
| Field Name | CF ESI Interview Sessions for Interview Event |
| Business Object | Interview |
| Function | Extract Single Instance |
| Source Field | Interview Sessions |
| Related Business Object | Interview Session |
| Condition | Any is True |
| Sort Field | Current Effective Date |
| Sort Direction | Ascending (A to Z) |
| Instance to be Returned | First occurrence |
Field 2 - read the interview type
| Field | Value |
|---|---|
| Field Name | CF LRV Interview Type for Interview |
| Business Object | Interview |
| Function | Lookup Related Value |
| Lookup Field | CF ESI Interview Sessions for Interview Event |
| Related Business Object | Interview Session |
| Return Value | Interview Type |
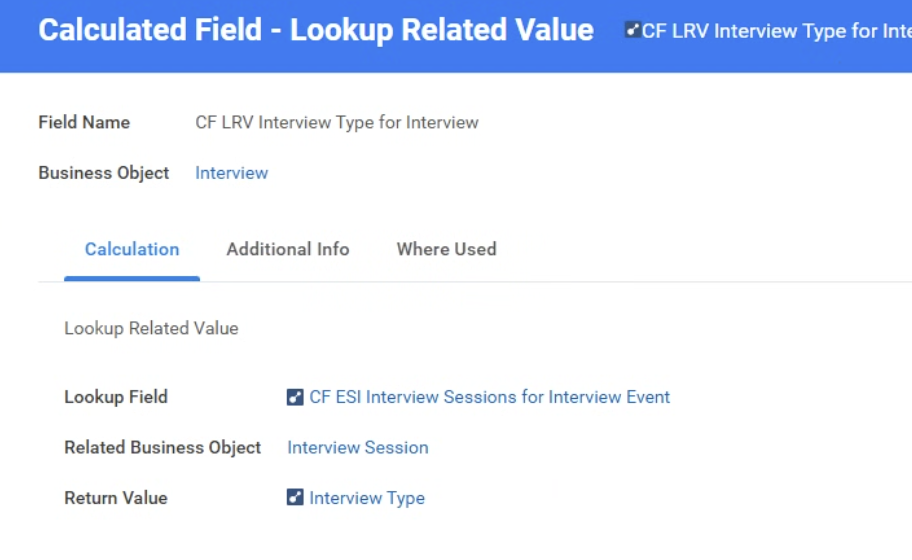
Leave Field Source as Global on both so they can be reused.
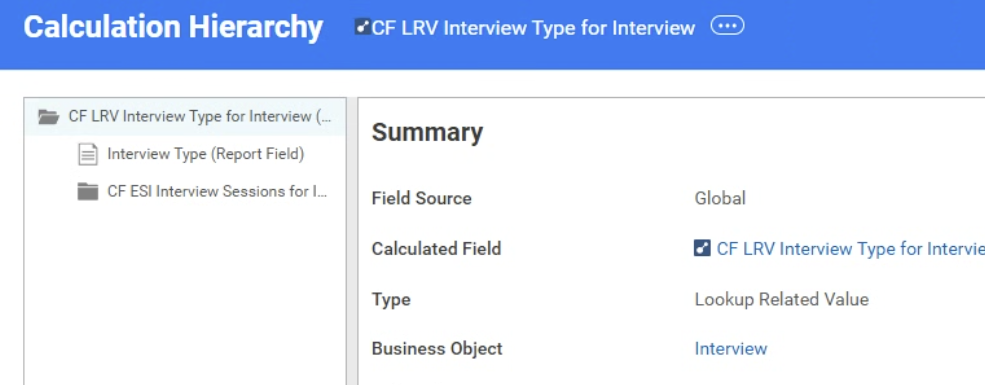
To confirm the pair is wired correctly, run the Calculation Hierarchy report on CF LRV Interview Type for Interview. It should show Interview Type alongside the first field nested beneath it:
TIP
Interview Type is only populated if your requisitions set it. On the requisition's Manage Interview Scheduling Settings > Interview Team tab, set Interview Type to Video for the interviews that need verification. If the interview type is left blank, the validation has nothing to compare and will not fire.
3b. Create the condition rule
Validation conditions are inverted from what most people expect: a rule that evaluates to true is what raises the error, and a rule that evaluates to false lets the submit through. The rule therefore describes the violation - an external video interview with the account missing - rather than the requirement.
Open the Interview business process definition
In the Workday search bar, type "Business Process Definitions" and select the report.
Confirm the View As Of date and click OK.
Filter the list to the process you want: click the filter icon, Add, set Column to Business Process, and set the value to Interview (module
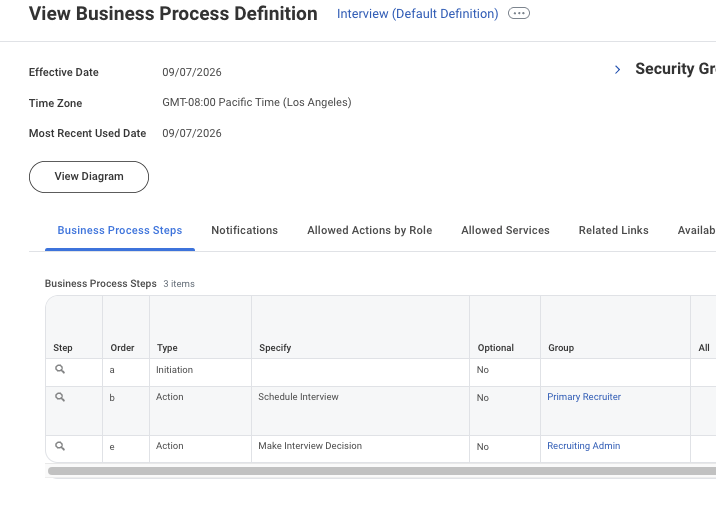
Candidate Evaluation:Interview).Click the Interview link in the Default Definition column. This opens View Business Process Definition, where the Business Process Steps tab lists the three steps of the process.
Use the Definitions for Business Objects column instead if the rule should apply to one supervisory organization rather than the whole tenant.
Open the Schedule Interview step
In the Business Process Steps grid, find the row where Type is Action and Specify is Schedule Interview - order b, group Primary Recruiter.
Click the magnifier icon in the Step column of that row - the leftmost column, before Order. This opens View Workflow Step.
Launch Create Condition Rule from the step
On View Workflow Step, click the ... (Related Actions) beside the step name at the top.
Hover Business Process in the Actions menu, then choose Create Condition Rule - the first entry in that submenu.
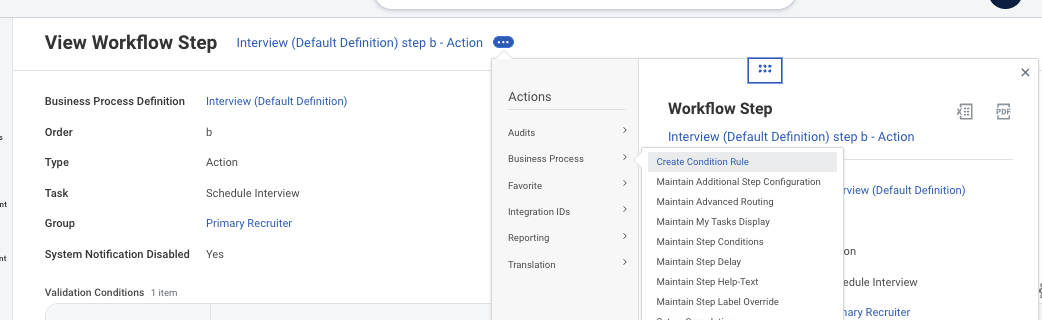
Fill in the rule
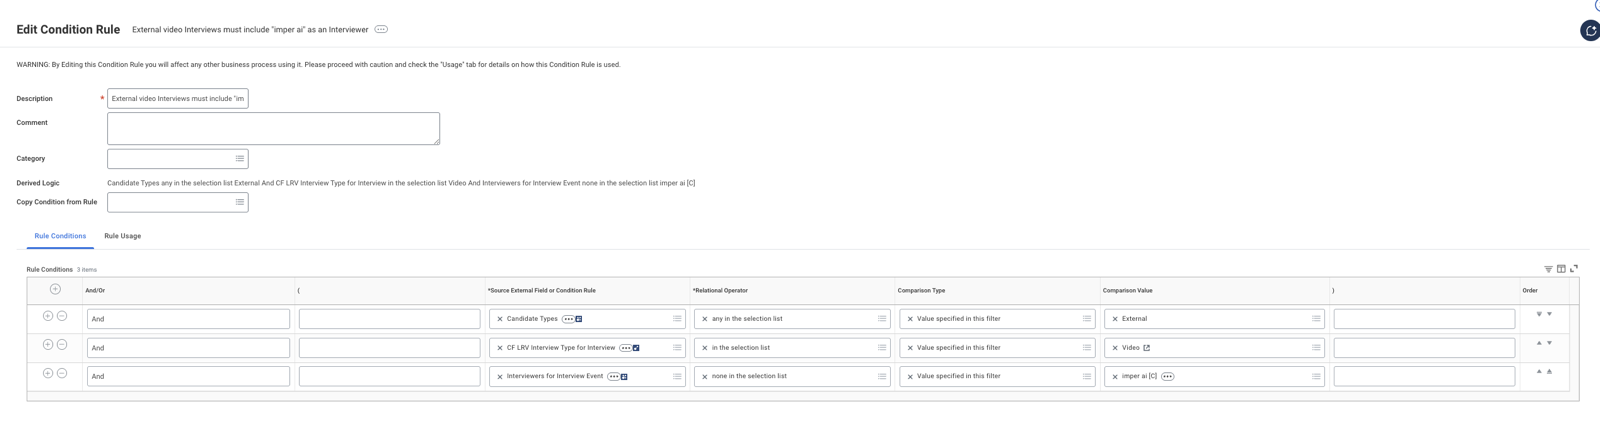
In Description, enter
External video Interviews must include "imper ai" as an Interviewer. This is the text that appears later in the step's Validation column, so keep it descriptive.Leave Comment and Category empty.
The Rule Conditions grid starts with one blank row. Click the + in the left gutter twice more to get three rows in total.
Fill the rows as below. For each Source External Field, click the prompt, type part of the field name, press Enter, then pick it from the results - typing alone does not trigger the search.
| And/Or | Source External Field | Relational Operator | Comparison Value |
|---|---|---|---|
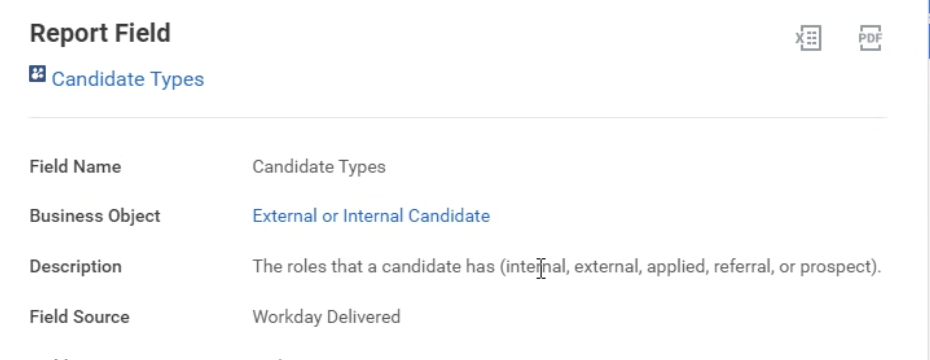
| And | Candidate Types | any in the selection list | External |
| And | CF LRV Interview Type for Interview | in the selection list | Video |
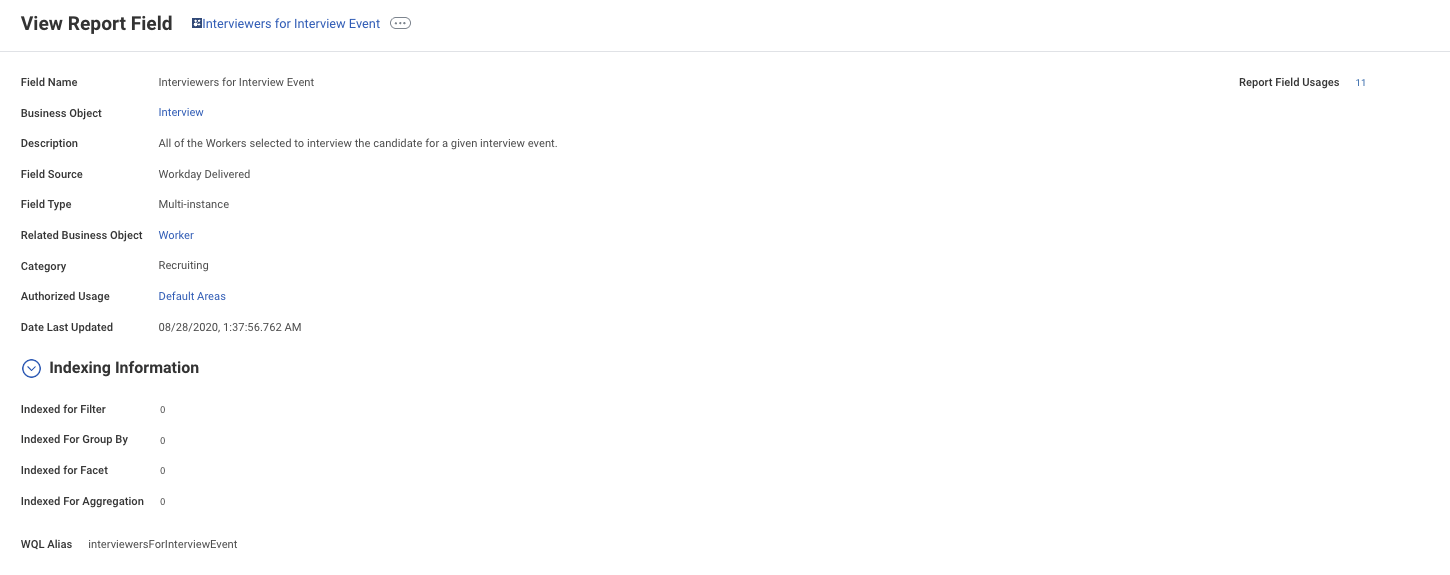
| And | Interviewers for Interview Event | none in the selection list | imper ai [C] |
Leave both parenthesis columns empty. All three rows are joined by And, so no grouping is needed.
Leave Comparison Type at its prefilled Value specified in this filter on every row.
Click OK to save the rule.
The third row is what makes the rule evaluate to true when the account is missing, which is what triggers the block.
3c. Attach the rule to the Schedule Interview step
The rule now exists in the tenant but is not attached to anything, so it has no effect yet. Attaching it happens in the second of the two Business Process entries you saw in 3b.
Return to View Workflow Step for the Schedule Interview step, using steps 1 to 6 of 3b if you have navigated away.
Click the step's ... (Related Actions), hover Business Process, and this time choose Maintain Step Conditions - four entries below Create Condition Rule in the same submenu.
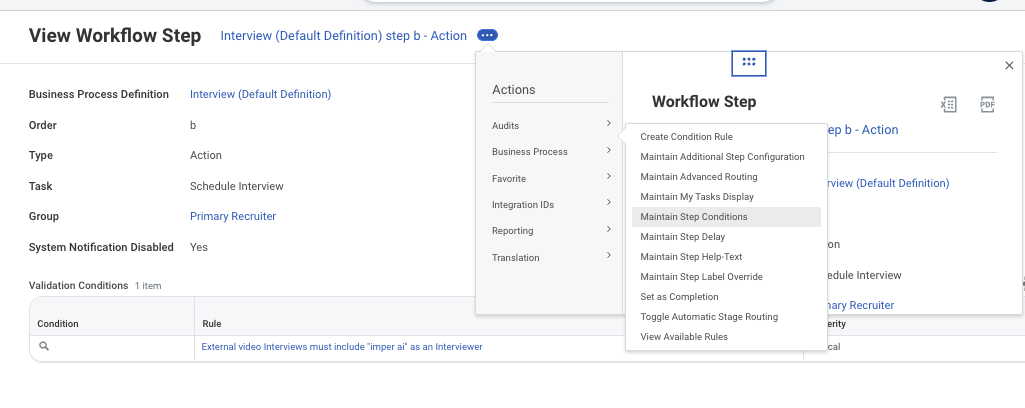
Confirm the Effective Date and click OK.
Open the Validation Conditions tab - not Entry Conditions. Entry conditions control whether the step runs at all; validation conditions are what block a submit.
Click the + in the grid's left gutter to add a row.
In Rule, type part of your rule's description, press Enter, and pick it from the results.
Set Severity to Critical. It is selected by default, but confirm it - Warning lets the interview through with a message.
Leave Enable Validation Conditions for Add Approvers unticked. It only applies to ad hoc approvers, not to the scheduling submit.
Click Submit.
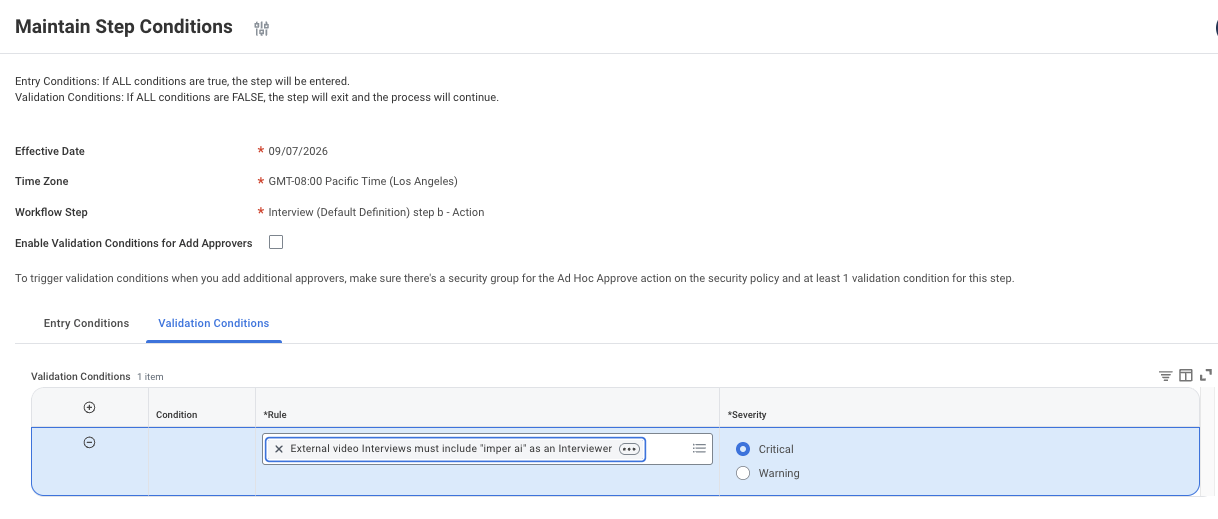
Note the two lines Workday prints at the top of this page:
Entry Conditions: If ALL conditions are true, the step will be entered. Validation Conditions: If ALL conditions are FALSE, the step will exit and the process will continue.
Exiting and continuing is the success path, which is why a rule that evaluates to true is the one that blocks - the same inversion described at the start of 3b.
NOTE
The Validation column in the Business Process Steps grid is read-only, including inside Edit Definition - the rule renders as plain text with no prompt, and clicking it does nothing. Maintain Step Conditions on the individual step is the only place validations can be added or removed.
Once configured, the definition shows the validation in the Validation column of the Schedule Interview step:
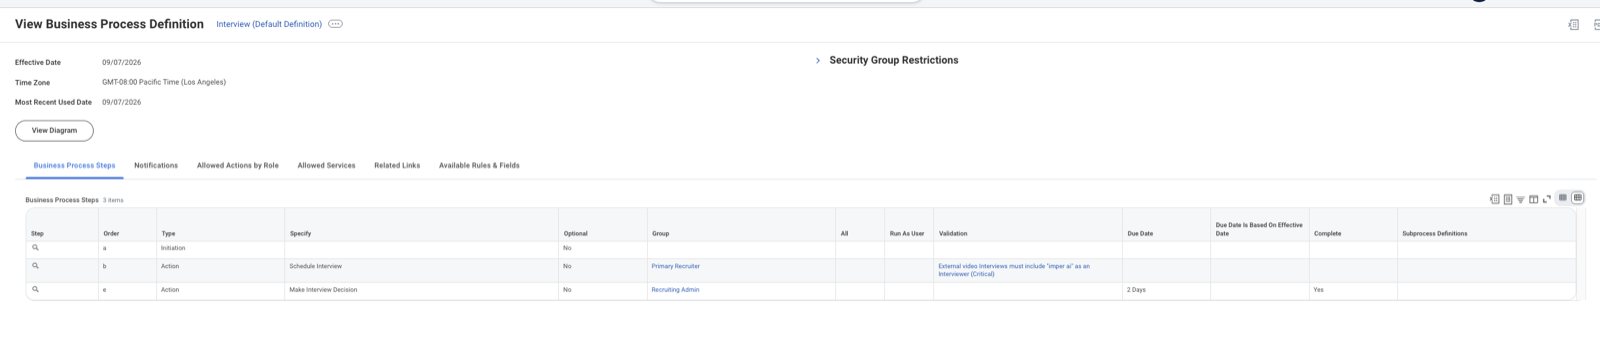
Because the severity is Critical, Workday refuses the submit outright rather than warning the recruiter and letting the interview through - which is what guarantees the candidate receives a verification link.
Keep the Interview Event Name Unchanged
Workday names each interview event using its default naming, which carries the candidate and requisition identifiers imper.ai uses to match the interview to the right candidate.
Leave that name as Workday generates it. If the event is renamed - in Workday or on the calendar afterwards - imper.ai can no longer match the interview, and the candidate does not receive a verification link.
Next Steps
Continue to Integrating Workday with imper.ai for Hiring to create the Integration System User and connect Workday.